How to Transfer & Receive a Sub-Account
Transferring sub-accounts is a straightforward process designed to enhance account management and operational efficiency. This guide will walk you through the steps and considerations for transferring sub-accounts effectively.
Why Transfer Sub-Accounts?
Transferring sub-accounts can be necessary for various reasons, including organizational restructuring, account ownership changes, or optimizing account management. This feature ensures that sub-accounts are managed by the appropriate users or teams without data loss or service interruption.
Step-by-Step Guide to Transfer Sub-Accounts
1. Accessing the Sub-Account Transfer Feature
To begin the transfer process, navigate to the sub-account section from the Agency dashboard.
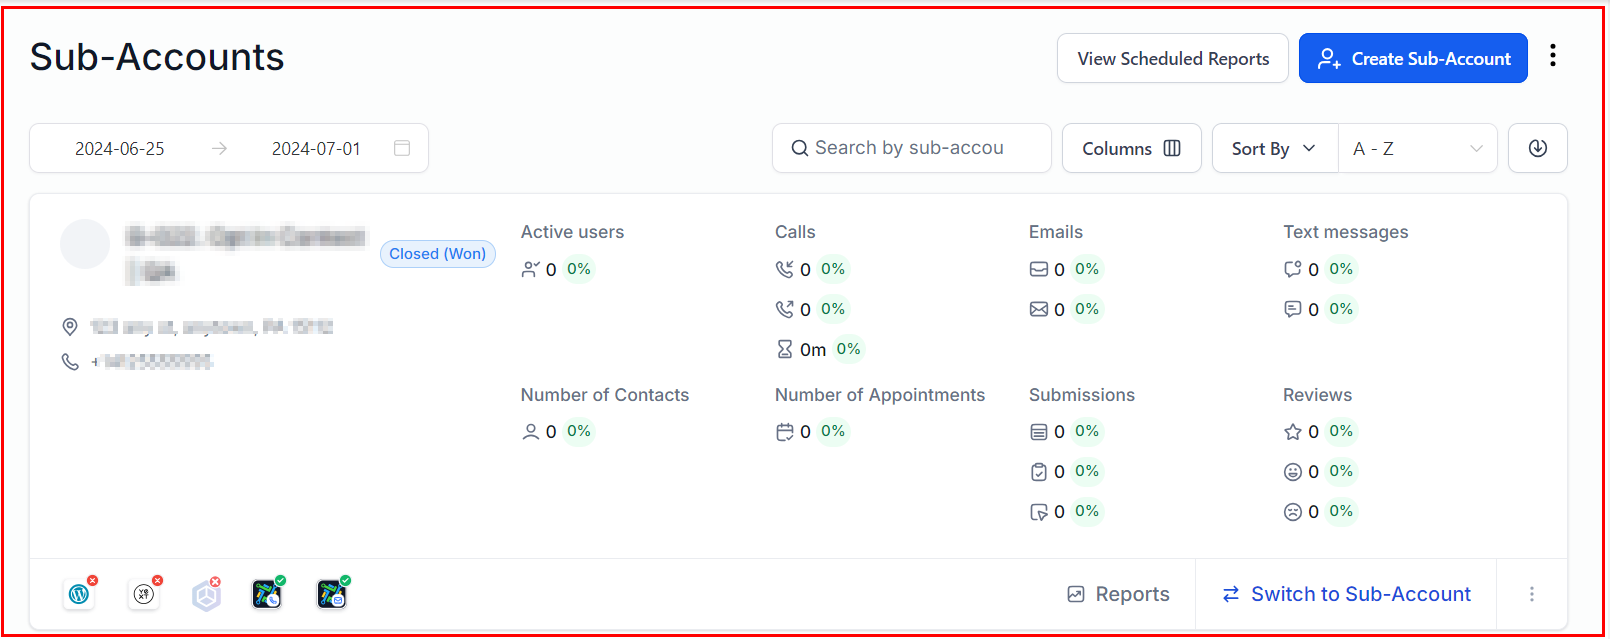
2. Selecting the Sub-Account
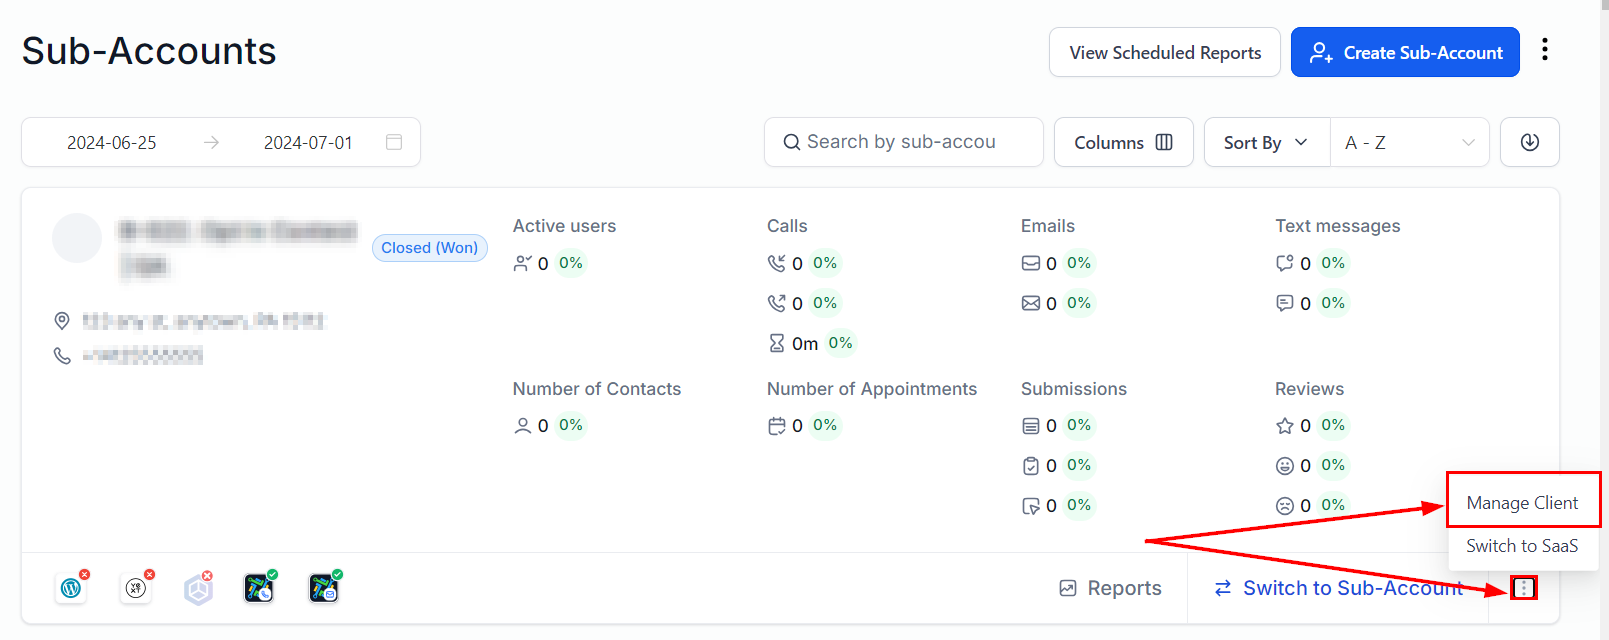
Identify the sub-account you wish to transfer, then select the “Manage Client” option from the 3-dot dropdown. Carefully review the account details to ensure you are transferring the correct sub-account.
3. Initiating the Transfer
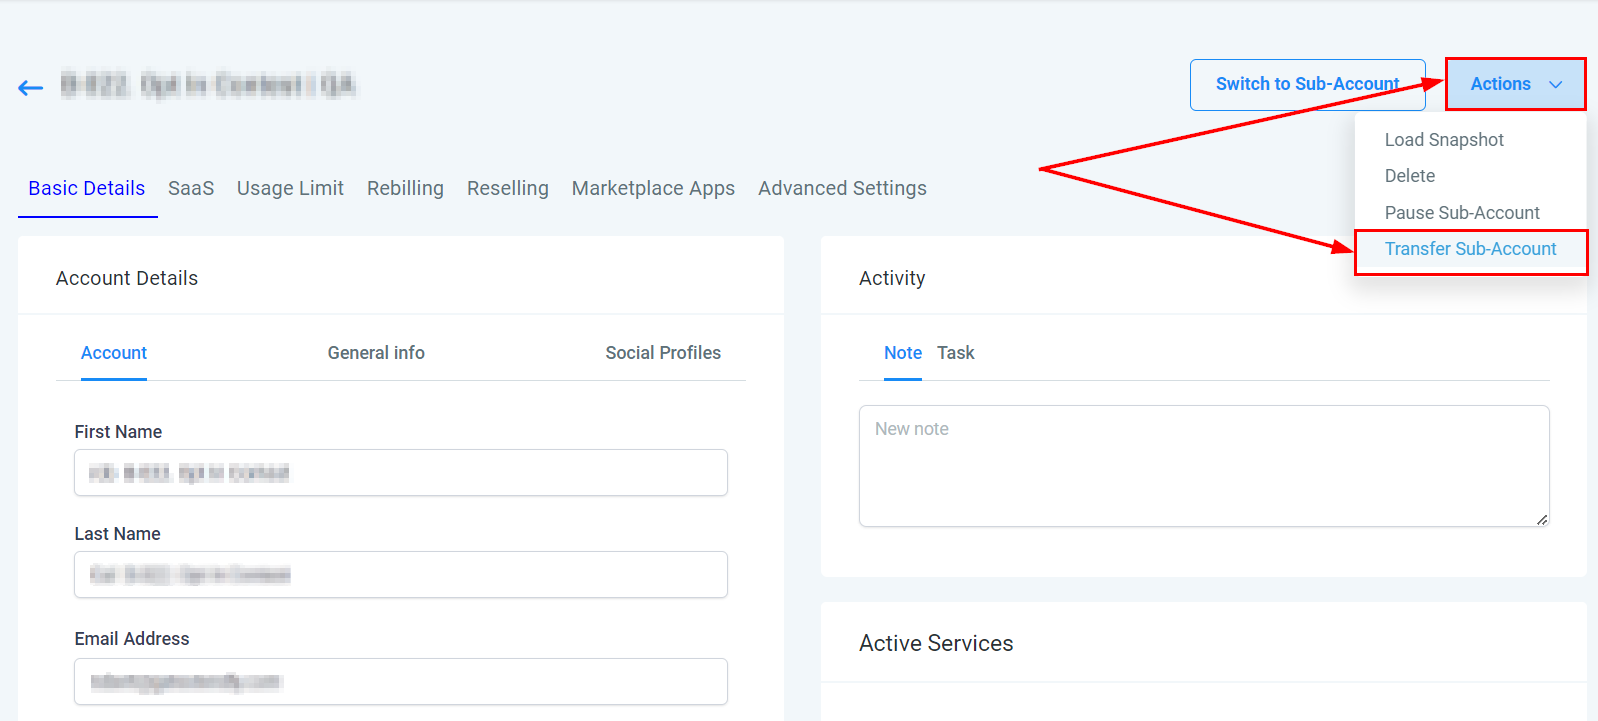
Click on the Transfer subaccount option, found within the actions dropdown. You will be prompted to enter the Relationship Number of the agency that you need to transfer the sub-account to. Ensure that the information is accurate to avoid any transfer issues.
4. Confirming the Transfer
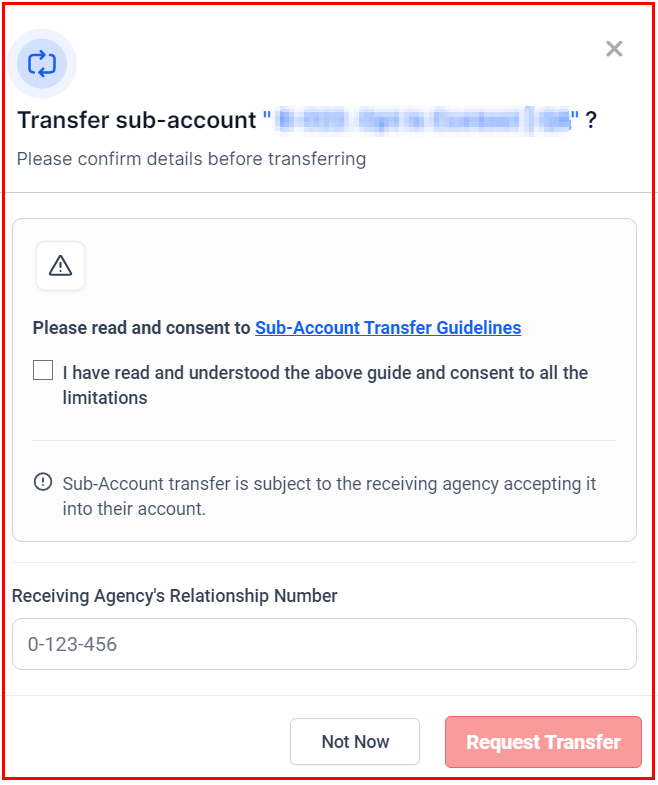
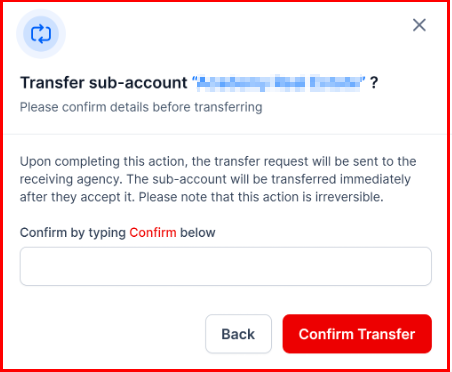
After entering the recipient’s details, review the transfer information carefully. Request the transfer after following the on-screen instructions. This includes reading and consenting to the Sub-Account Transfer Guidelines.
5. Finalizing the Transfer
Upon confirming the action, a request will be sent to the receiving agency. The sub-account will be transferred immediately once the request is approved.
Step 6: Tracking the Transfer
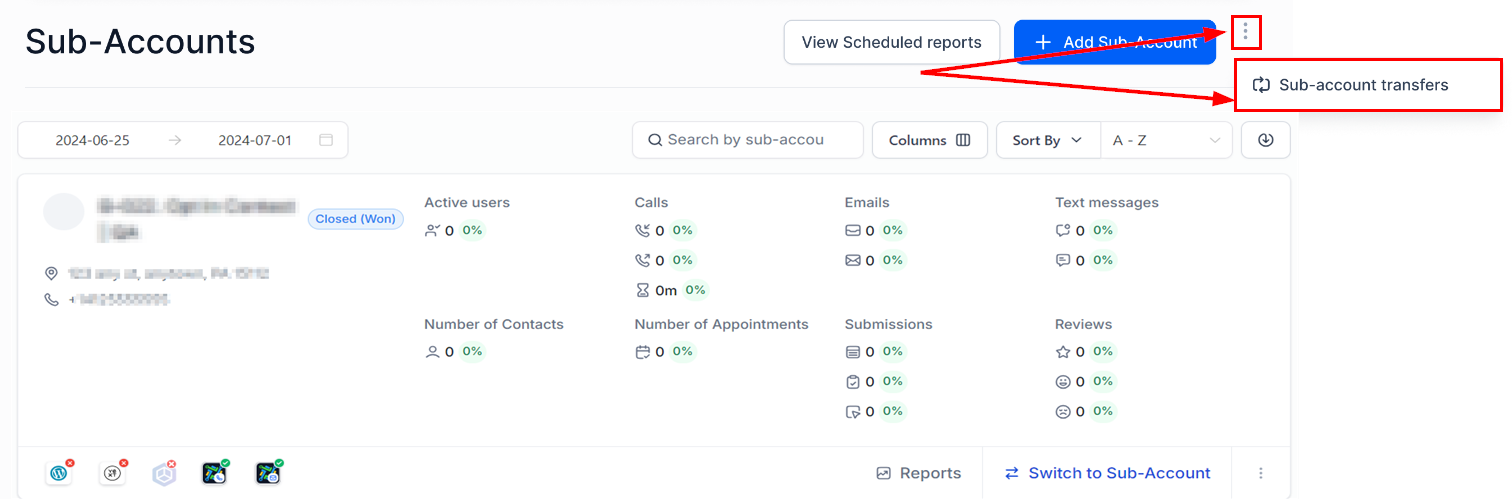
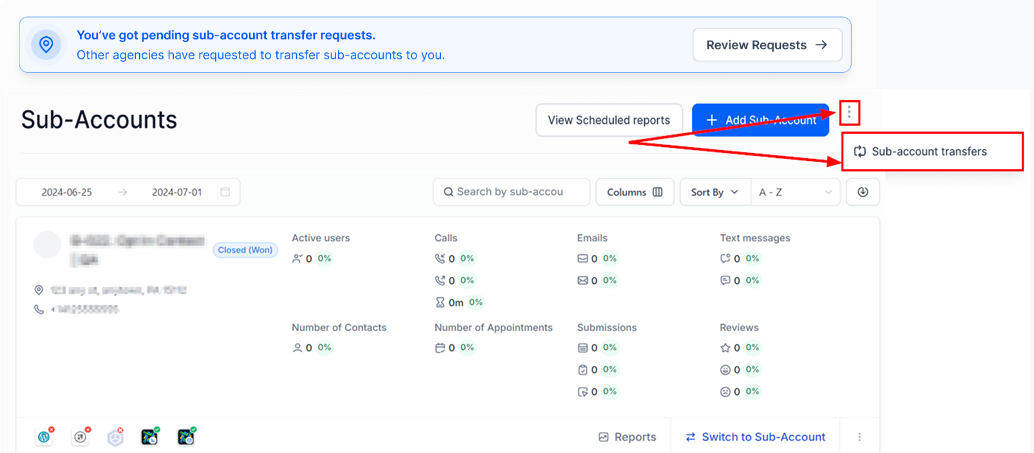
To monitor your sub-account transfer requests, go to Agency Level > Sub-Accounts and select the Sub-account Transfers option.
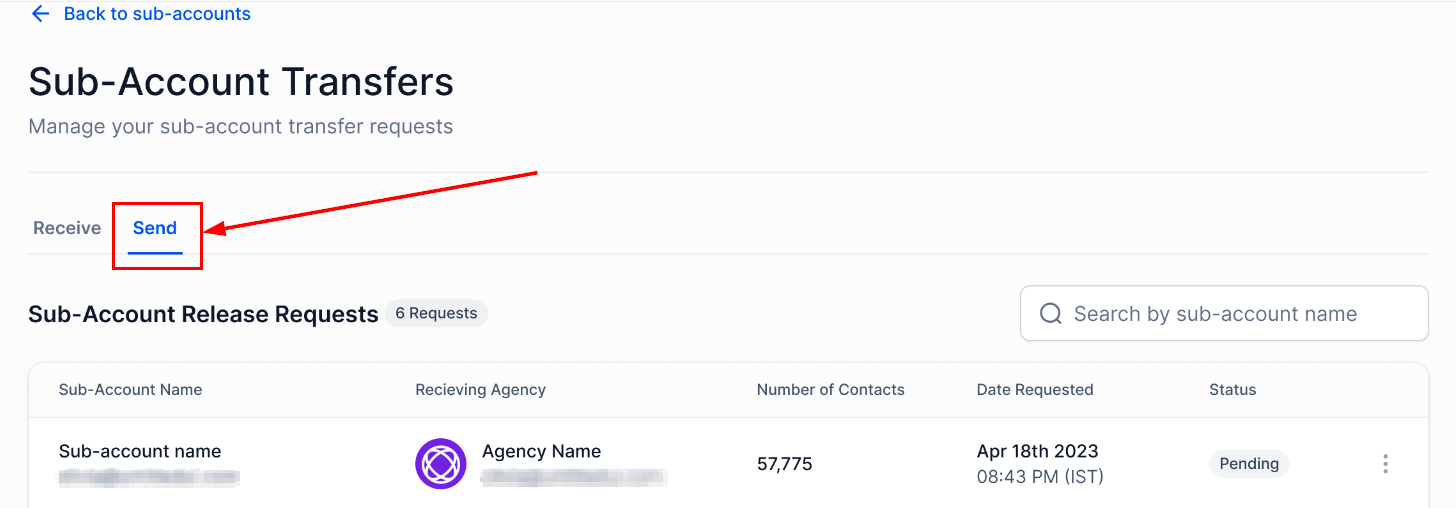
Then, navigate to the Send tab. To cancel a transfer request, click on the 3-Dot Menu and choose Cancel Request.
Step-by-Step Guide to Receive a Sub-Account Transfer
1. Initiate Transfer Request
The releasing agency has to initiate the transfer request by following the steps outlined above.
2. Review Request
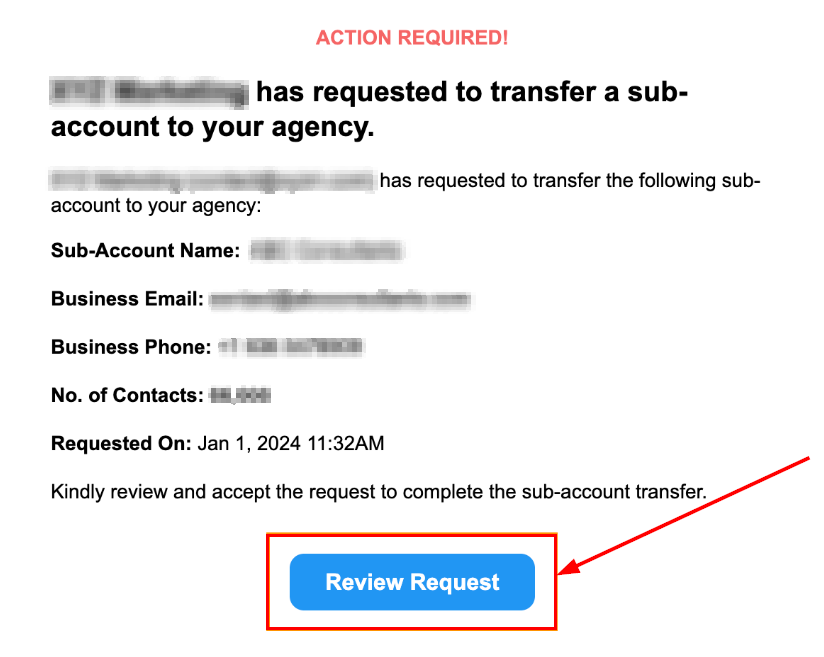
Upon submission of their request, you will receive an email notification. Click on the “Review Request” button to proceed.
Alternatively, navigate to Agency Level, then select Sub-Accounts, and choose the Sub-account Transfers option.
3. Approve the Request
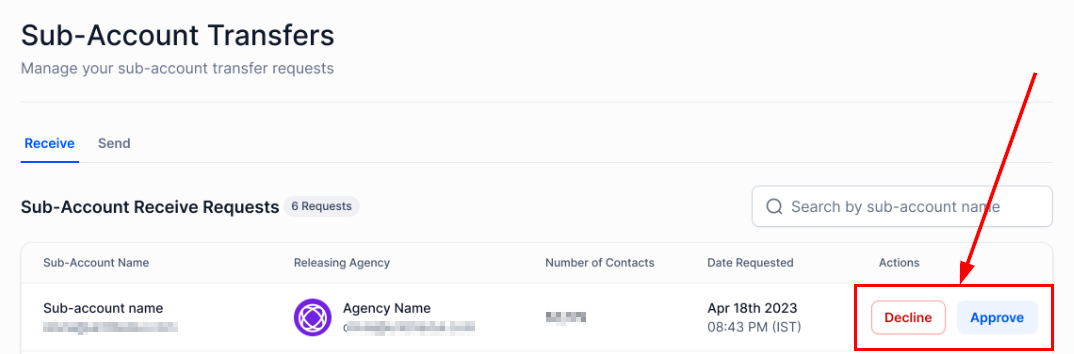
On the Transfer Requests page, approve the request. Once approved, the sub-account will be transferred to your agency.
Important Considerations
Data Integrity
Verify that all data associated with the sub-account, including contacts, campaigns, and settings, are transferred accurately. It is advisable to back up important data before initiating the transfer.
Notification and Verification
Both parties involved in the transfer should monitor their emails and notifications to confirm the transfer’s success and address any issues promptly.
Information and assets that will be transferred:
- Sub-account API Keys
- Funnels and Websites
- Calendars
- Automation- Enrolled Contacts will remain active within workflows and the workflow-enrolled data will remain the same. 📌Note: All workflows will be Published.
- Contacts and their conversations, appointments, opportunities, and history.
- Account users only assigned to the account being transferred.
📌Please Note: The external calendar integrations will be disconnected.
What Data and Assets Are Not Transferred?
When transferring a sub-account, please be aware of the following exclusions:
- Authentication Connections: All authentication connections will be deleted, including those for Google, Facebook, Instagram, QuickBooks, Clio, DrChrono, and Yext.
- Settings: All Facebook and Google settings will be cleared.
- Stripe Fields: Sub-account-level Stripe fields will be cleared.
- SaaS Settings: SaaS settings will not be transferred. Note that SaaS mode will automatically be disabled before the transfer takes place.
- Smartlists: Currently, Smartlists do not transfer with the sub-account.
- Mailgun/SMTP: Mailgun/SMTP settings will not be transferred.
- Active Subscriptions: Active subscriptions such as WordPress, Yext, WhatsApp, Dedicated IP, etc., will not be transferred and must be canceled before the transfer can occur.
Phone Number Transfers
Both Agencies on LeadConnector
If both the releasing and receiving agencies, along with the sub-account to be transferred, are using LeadConnector, the phone numbers will automatically transfer with the sub-account. The A2P DLC status will be retained, meaning sub-accounts do not need to re-register phone numbers that are already registered. All future phone usage charges will be accrued by the receiving agency.
One or Both Agencies Not on LeadConnector (Using Twilio)
If either the releasing or receiving agency, or both, are using Twilio instead of LeadConnector, no phone numbers will be transferred. In this case, you are responsible for coordinating with the previous account owner and Twilio to transfer any desired phone numbers to the sub-account.
Troubleshooting
Common issues may include permission errors, data transfer discrepancies, or account verification problems. If you encounter any issues during the transfer process, consult the support team for assistance.
By following these steps and considerations, you can ensure a smooth and efficient transfer of sub-accounts, maintaining the integrity and continuity of your business operations.
Frequently Asked Questions (FAQs)
Q: Is it possible to merge one Sub-Account with another?
- No, Sub-Account transfers involve moving the entire sub-account rather than just its data. This process entails transferring the sub-account from one agency to another.
Q: Can a HIPAA-enabled Sub-Account be transferred?
- HIPAA-compliant sub-accounts can only be transferred if the receiving agency has also purchased the HIPAA Compliance add-on package from the Marketplace.
Q: What preparations are needed before transferring a sub-account?
- Ensure all users to be transferred have the User Type set to ‘Account’ and are assigned solely to the sub-account being transferred.
- Disable SaaS for any SaaS sub-accounts.
- Cancel all active subscriptions such as WordPress, Yext, WhatsApp, Dedicated IP, etc., before requesting the transfer.
Q: What steps are required after the transfer is complete?
- Reconnect all authentication connections (e.g., Google, Facebook, QuickBooks).
- Reinstate Facebook and Google integrations.
- Set up the sub-account-level Stripe account.
- Re-add LC Email, Mailgun/SMTP, and Twilio.
- Re-add your domains.
- Re-enable SaaS for any SaaS sub-accounts.
Q: Will deleted workflows be visible in the “Deleted” tab after a location transfer?
- Deleted workflows from the previous location will not be visible in the new location. Only deleted workflows from the new location will appear in the “Deleted” tab.