Facebook Conversion API
Through the Facebook Conversions API workflow action, you can submit information to Facebook when leads perform certain actions on your end. This feature bypasses the third-party block enforced by IOS and some other browsers because it allows you to send data directly to Facebook when leads convert. It also gives you the option to send custom events to Facebook, for example when you create an opportunity or when a customer purchases manually.
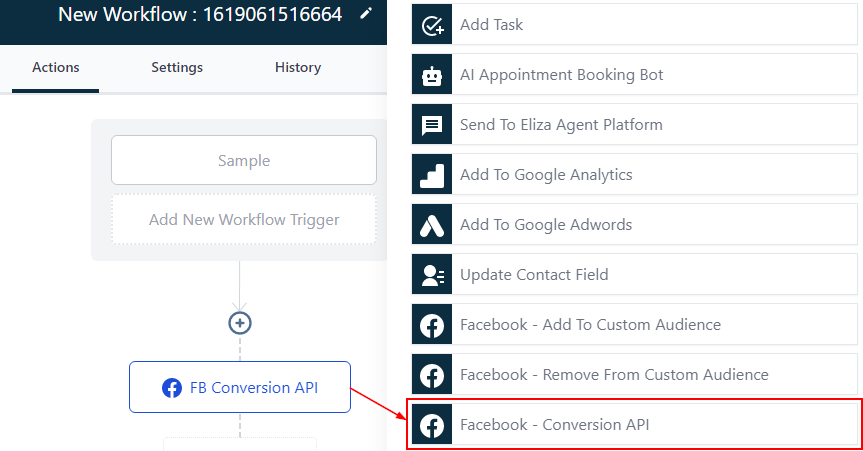
You can do this for leads you get from “Facebook Lead Ad” forms, or forms they submit on your own website. We’ll go through both cases below.
For leads that submit forms (or other types of submissions) on your own website
If your facebook ads lead to your own website with embedded FunnelBud forms, or FunnelBud funnel / website pages, then use this.
Creating your workflow trigger
Create a workflow that uses one of the following triggers:
- Form Submission
- Survey Submission
- Appointment Submission
- 2-step Order Form
You must use one of the above as triggers. When a leads submits one of the above, and that is used as a trigger, then the trigger will pass along some facebook and tracking data to the workflow. If you use any other trigger, then the facebook data won’t come into the workflow, and there will be nothing to send back to Facebook.
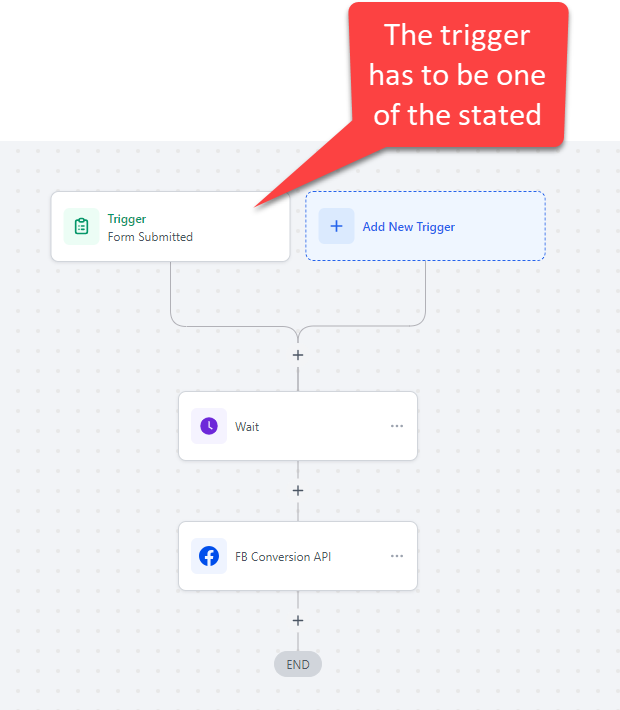
Adding the FB Conversion API action
Then, add the action “FB Conversion API” and fill in the values in the action. To enter the values here, you need to have a Facebook pixel set up and use that on your website. In Facebook, you need to perform the following steps:
- Go to your Facebook Business Manager -> Events Manager -> Data Sources -> Your pixel.
- Set up a new “Conversion API”. Use any event types that you want to track. You can set up all of them.
- When setting up your events, in each of the events, you have to select the following boxes: Event Source URL, Client IP Address, Client User Agent, Email, Click ID, Browser ID, First Name, Last Name. Then click continue.
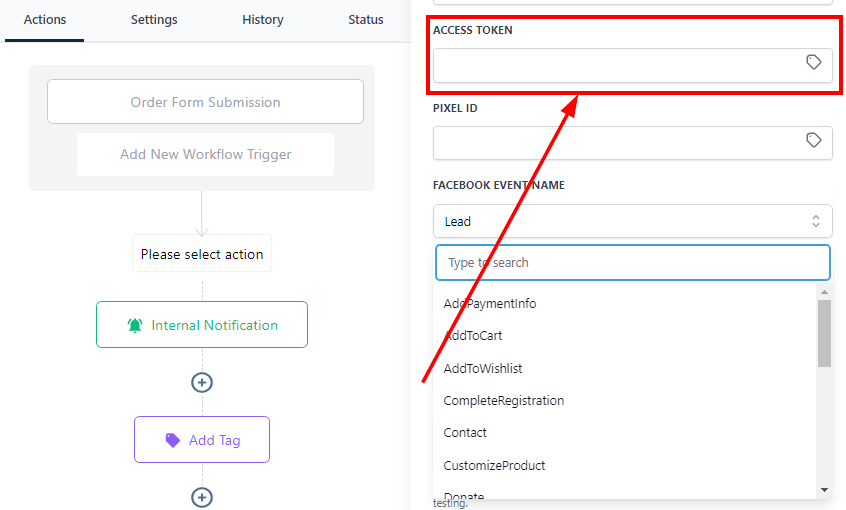
Once you have set up the Conversion API in Facebook, you can get the Access Token (you need to generate it first) and Pixel ID (can also be called “Dataset ID” in Facebook) from Facebook and add them to your workflow action. Usually these are found under your pixel’s “Settings” in Facebook.
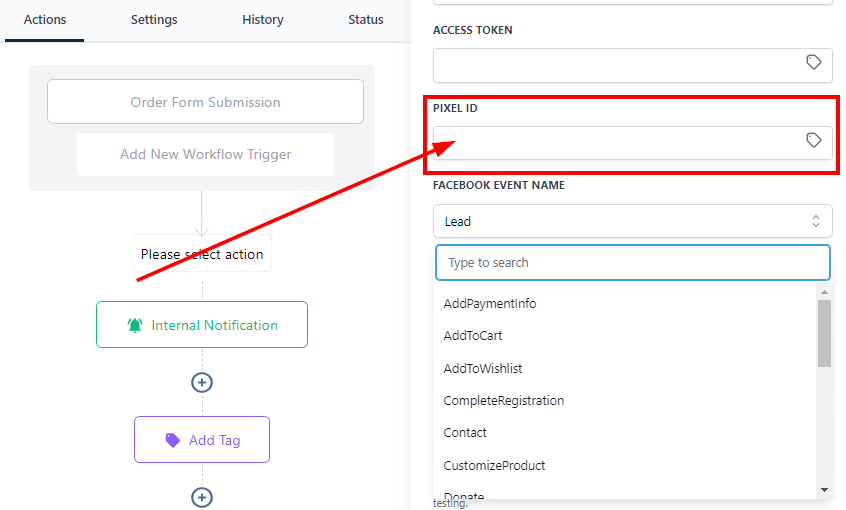
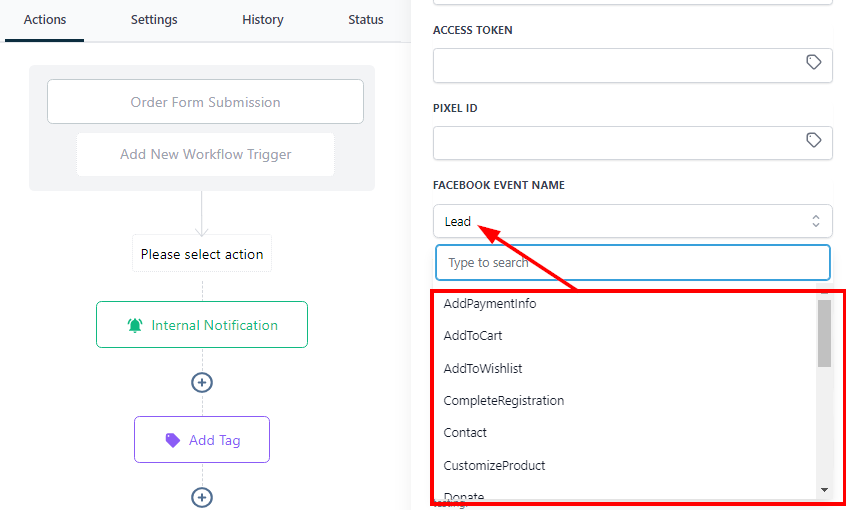
In the Event Name section, select which type of conversion event you want to send back.
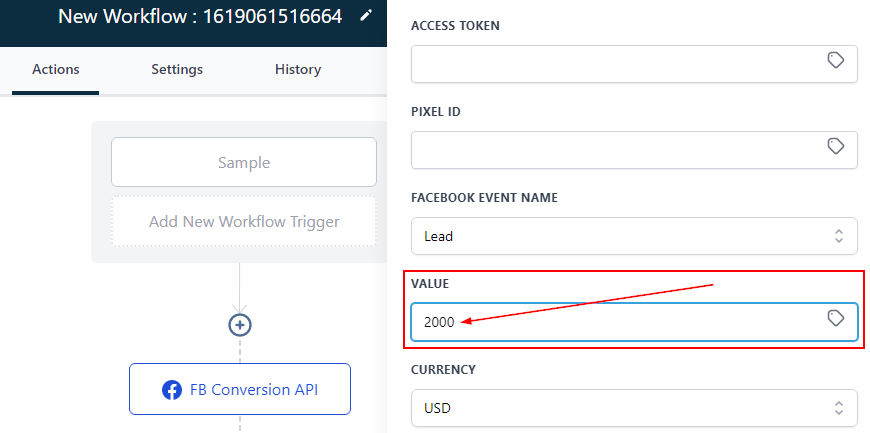
In the Value and Currency fields, insert the value of the event name selected above. This will create the lead value based on your preferences.
Testing if your workflow works
You need to test two different things. First, if the form submission brings in the Facebook pixel data to your workflow. Seconly, if the Conversion API action actually sends the data to Facebook and if Facebook receives it. Both tests need to be performed as if you are a real lead, so you cannot use “Test Workflow”. You have to actually click your ad and submit a form and go through the workflow.
Prepare your workflow for testing by going to the Facebook Business Manager account, and into Data Sources, and then find your Pixel. From there, go to the “Test events” tab and find a test code. Enter this test code in your workflow action and save:
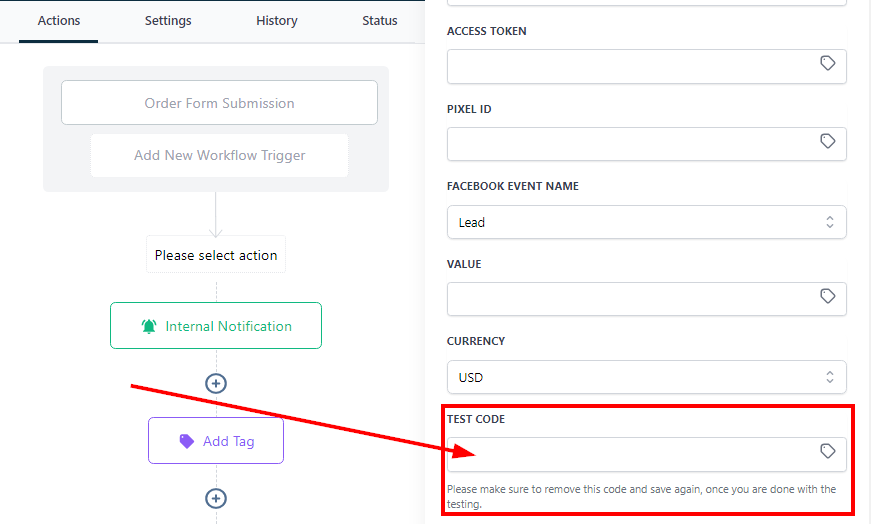
Remember to delete the test code and save your workflow after testing is completed, otherwise it won’t work!
To perform the test, click on your own facebook ad (use Facebook’s tool to view your own ad to do this) and then submit a form on your site.
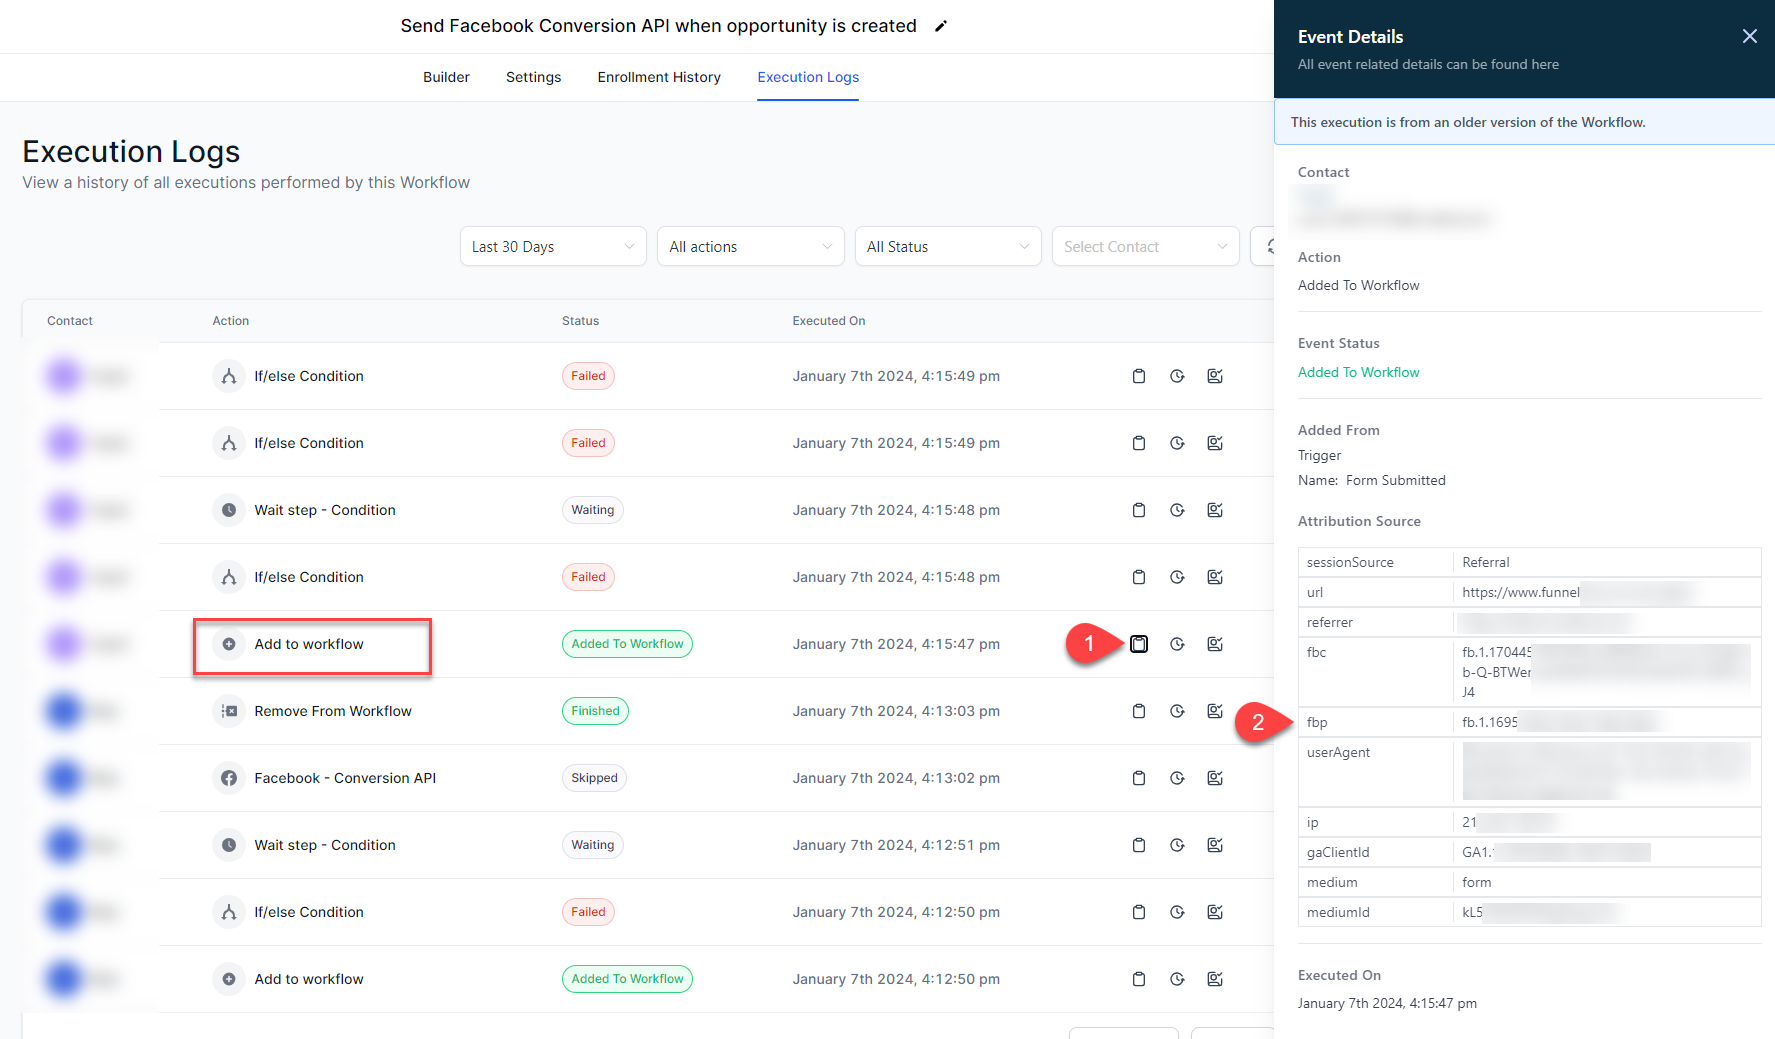
First, check that the form brings in the facebook pixel values. To do this, after submitting the form, go to the Workflow’s execution logs and click on the action that brought your test lead into the system. It should contain variables that include for example the Facebook pixel ID. That’s how you know the correct data came into the workflow. This is the data that the workflow will later send back to Facebook (in the Conversion API action):
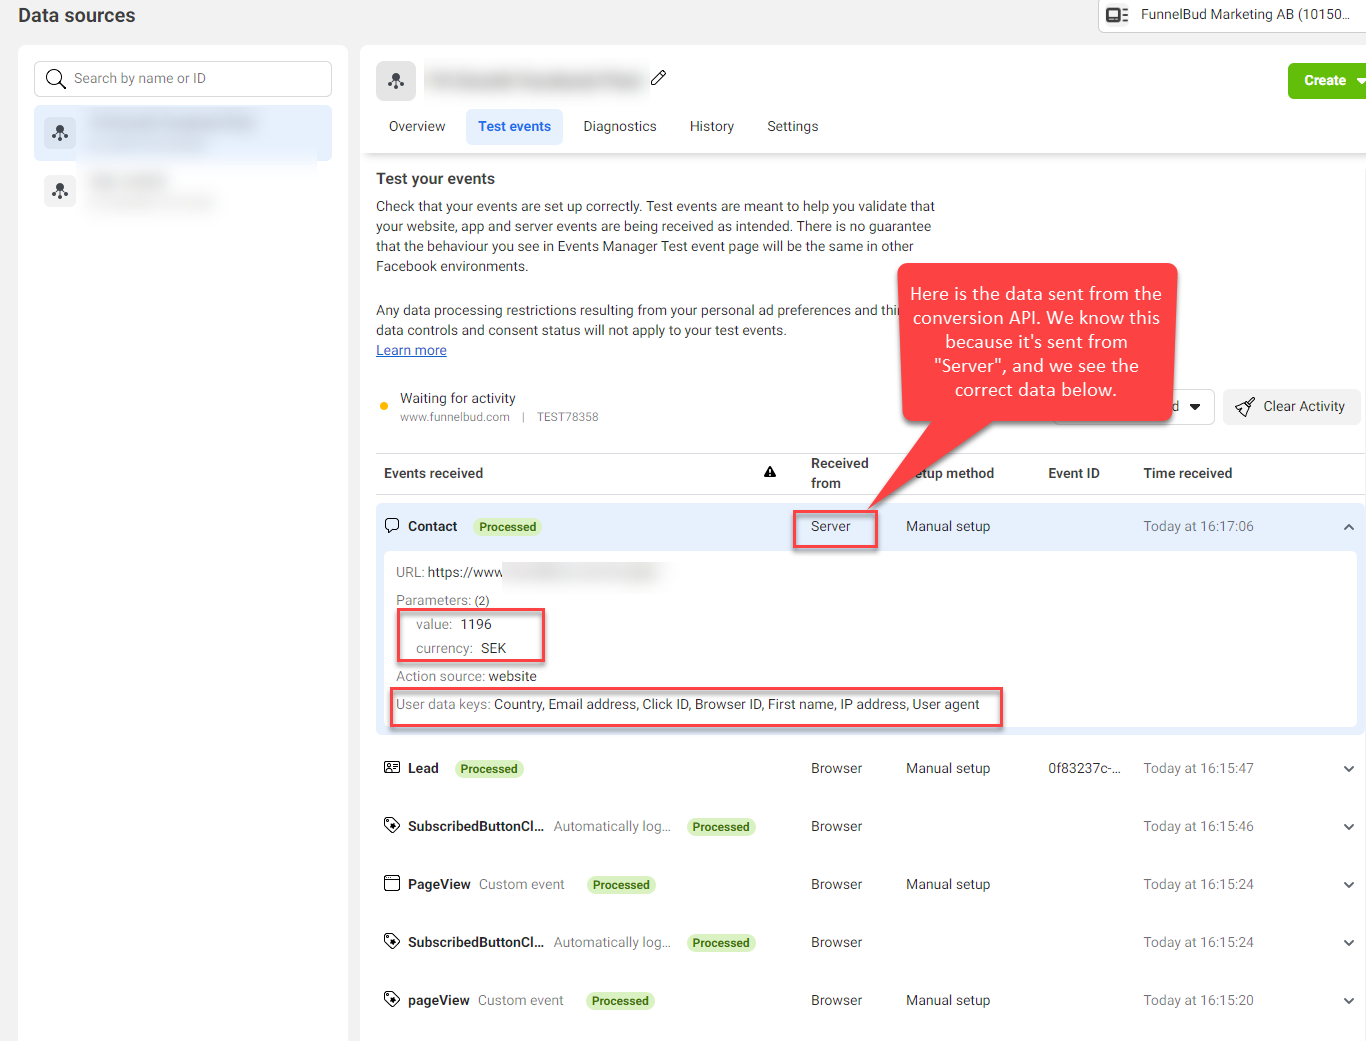
Then, check that the data was sent back to Facebook. To do this, in the execution logs, click on the action that sent the data back to Facebook and see what data was sent. Finally, go into Facebook again and check the “Test events” tab again, and see that the Conversion API data actually came in:
Sending events based on other actions (for example opportunity created or won, lead qualified, etc.)
If you’re a B2B business, you might want to send conversion events that the Facebook pixel can’t see, such as when you created an opportunity, moved an opportunity to a certain stage, won it, or for other actions that happen in the “back end” of your business.
In order to send such actions, add a “Wait” step before the “FB Conversion API” action or “If/then” branches and only sending data if certain conditions are fulfilled when the lead submits the form.
As an example, if you want to create a conversion event when a Facebook lead turnes into an opportunity, you can create a “Wait” step, select wait for “Condition”, and add “Tag” as a condition. Then add a tag called “Opp”.
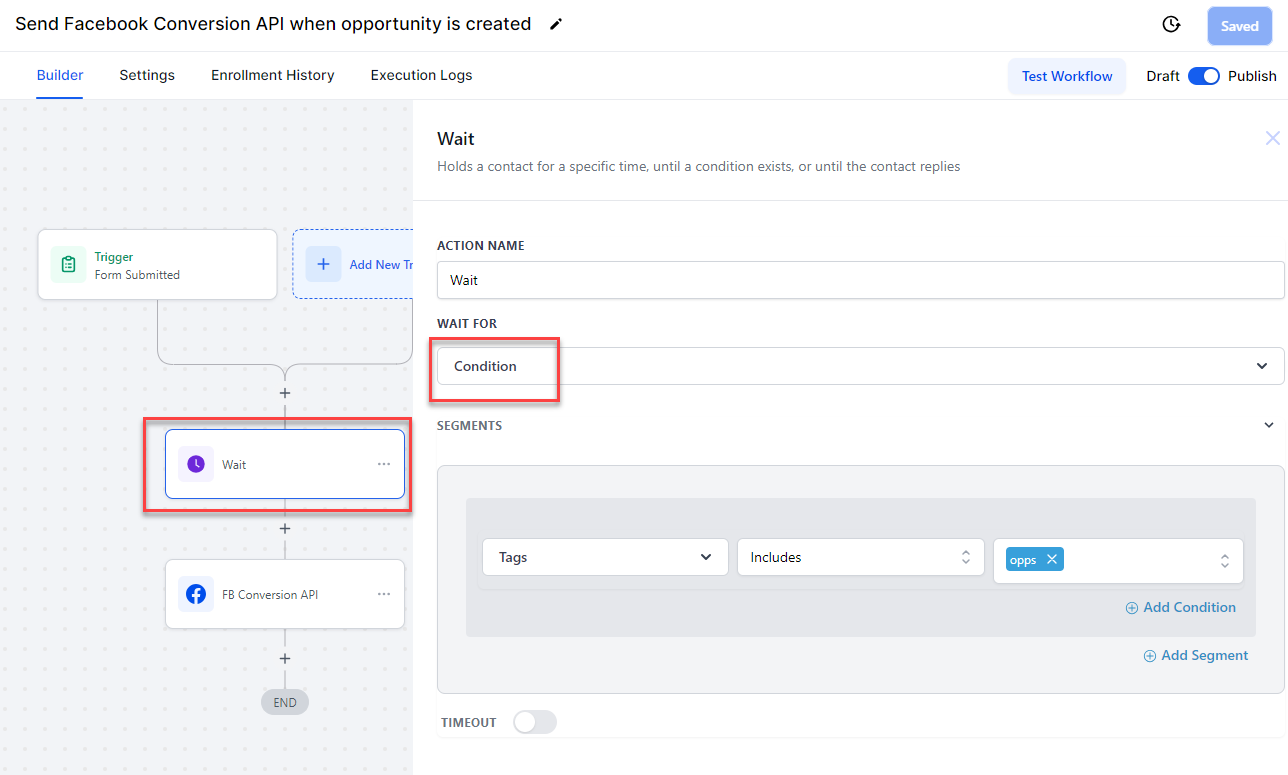
Next, create another workflow that adds the tag “Opp” whenever you create an opportunity.
What will happen is that leads that convert from Facebook will now stay in the “Wait” step until you have created an opportunity, and then the conversion event will be sent to Facebook.
For leads that submit Facebook Lead Ad forms
For this scenario, you’ll need to first make sure that your lead ad forms are mapped and coming into the system. Then you’ll need to connect Facebook with FunnelBud and create two workflows. More details below.
Step 1: Connect your Facebook pixel to FunnelBud
This step is performed in Facebook Business Manager —> Events Manager. From there, do this:
Click “Connect Data Sources”, and choose CRM. You can go through the steps and select the pixel you have or create a new pixel. It will then take you to a screen where you can choose your CRM.
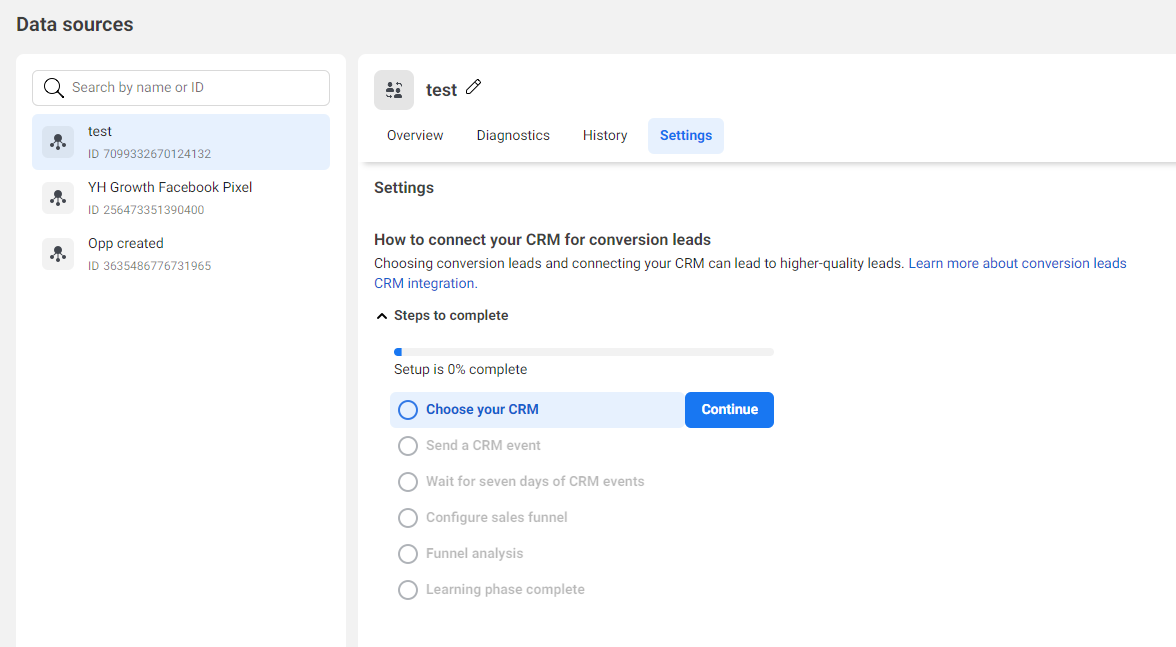
Choose “Select your CRM”. From the search bar you get, search for “Leadconnector”.
Select Use a third-party partner to connect in a few steps (no coding required), then choose LeadConnector. Then click on Go to Partner to proceed.
It will ask you to grant LeadConnector permission to connect with your Facebook Conversions API, and then your CRM should be connected.
Step 2: Create your workflows
You need to create Two Workflows for this process to work effectively. The first workflow focuses on generating leads and adding them to the correct pipeline with an Create/Update Opportunity Action. The second workflow focuses on triggering events for Facebook conversion leads.
Workflow 1 should have “Facebook Lead Form Submitted” as the trigger. Inside that trigger, you can filter for specific forms only if you wish.
And then add the action for Create or Update Opportunity.
Toggle on Allow Duplicate Opportunities for this particular workflow.
In Workflow Settings, please Allow Multiple contacts for this workflow.
Workflow 2 will send Conversion data to FB Conversion API.
Add a trigger for Pipeline Stage Change trigger (or another opportunity based trigger), and the settings you want in the trigger (i.e. when are you going to send this conversion data to Facebook).
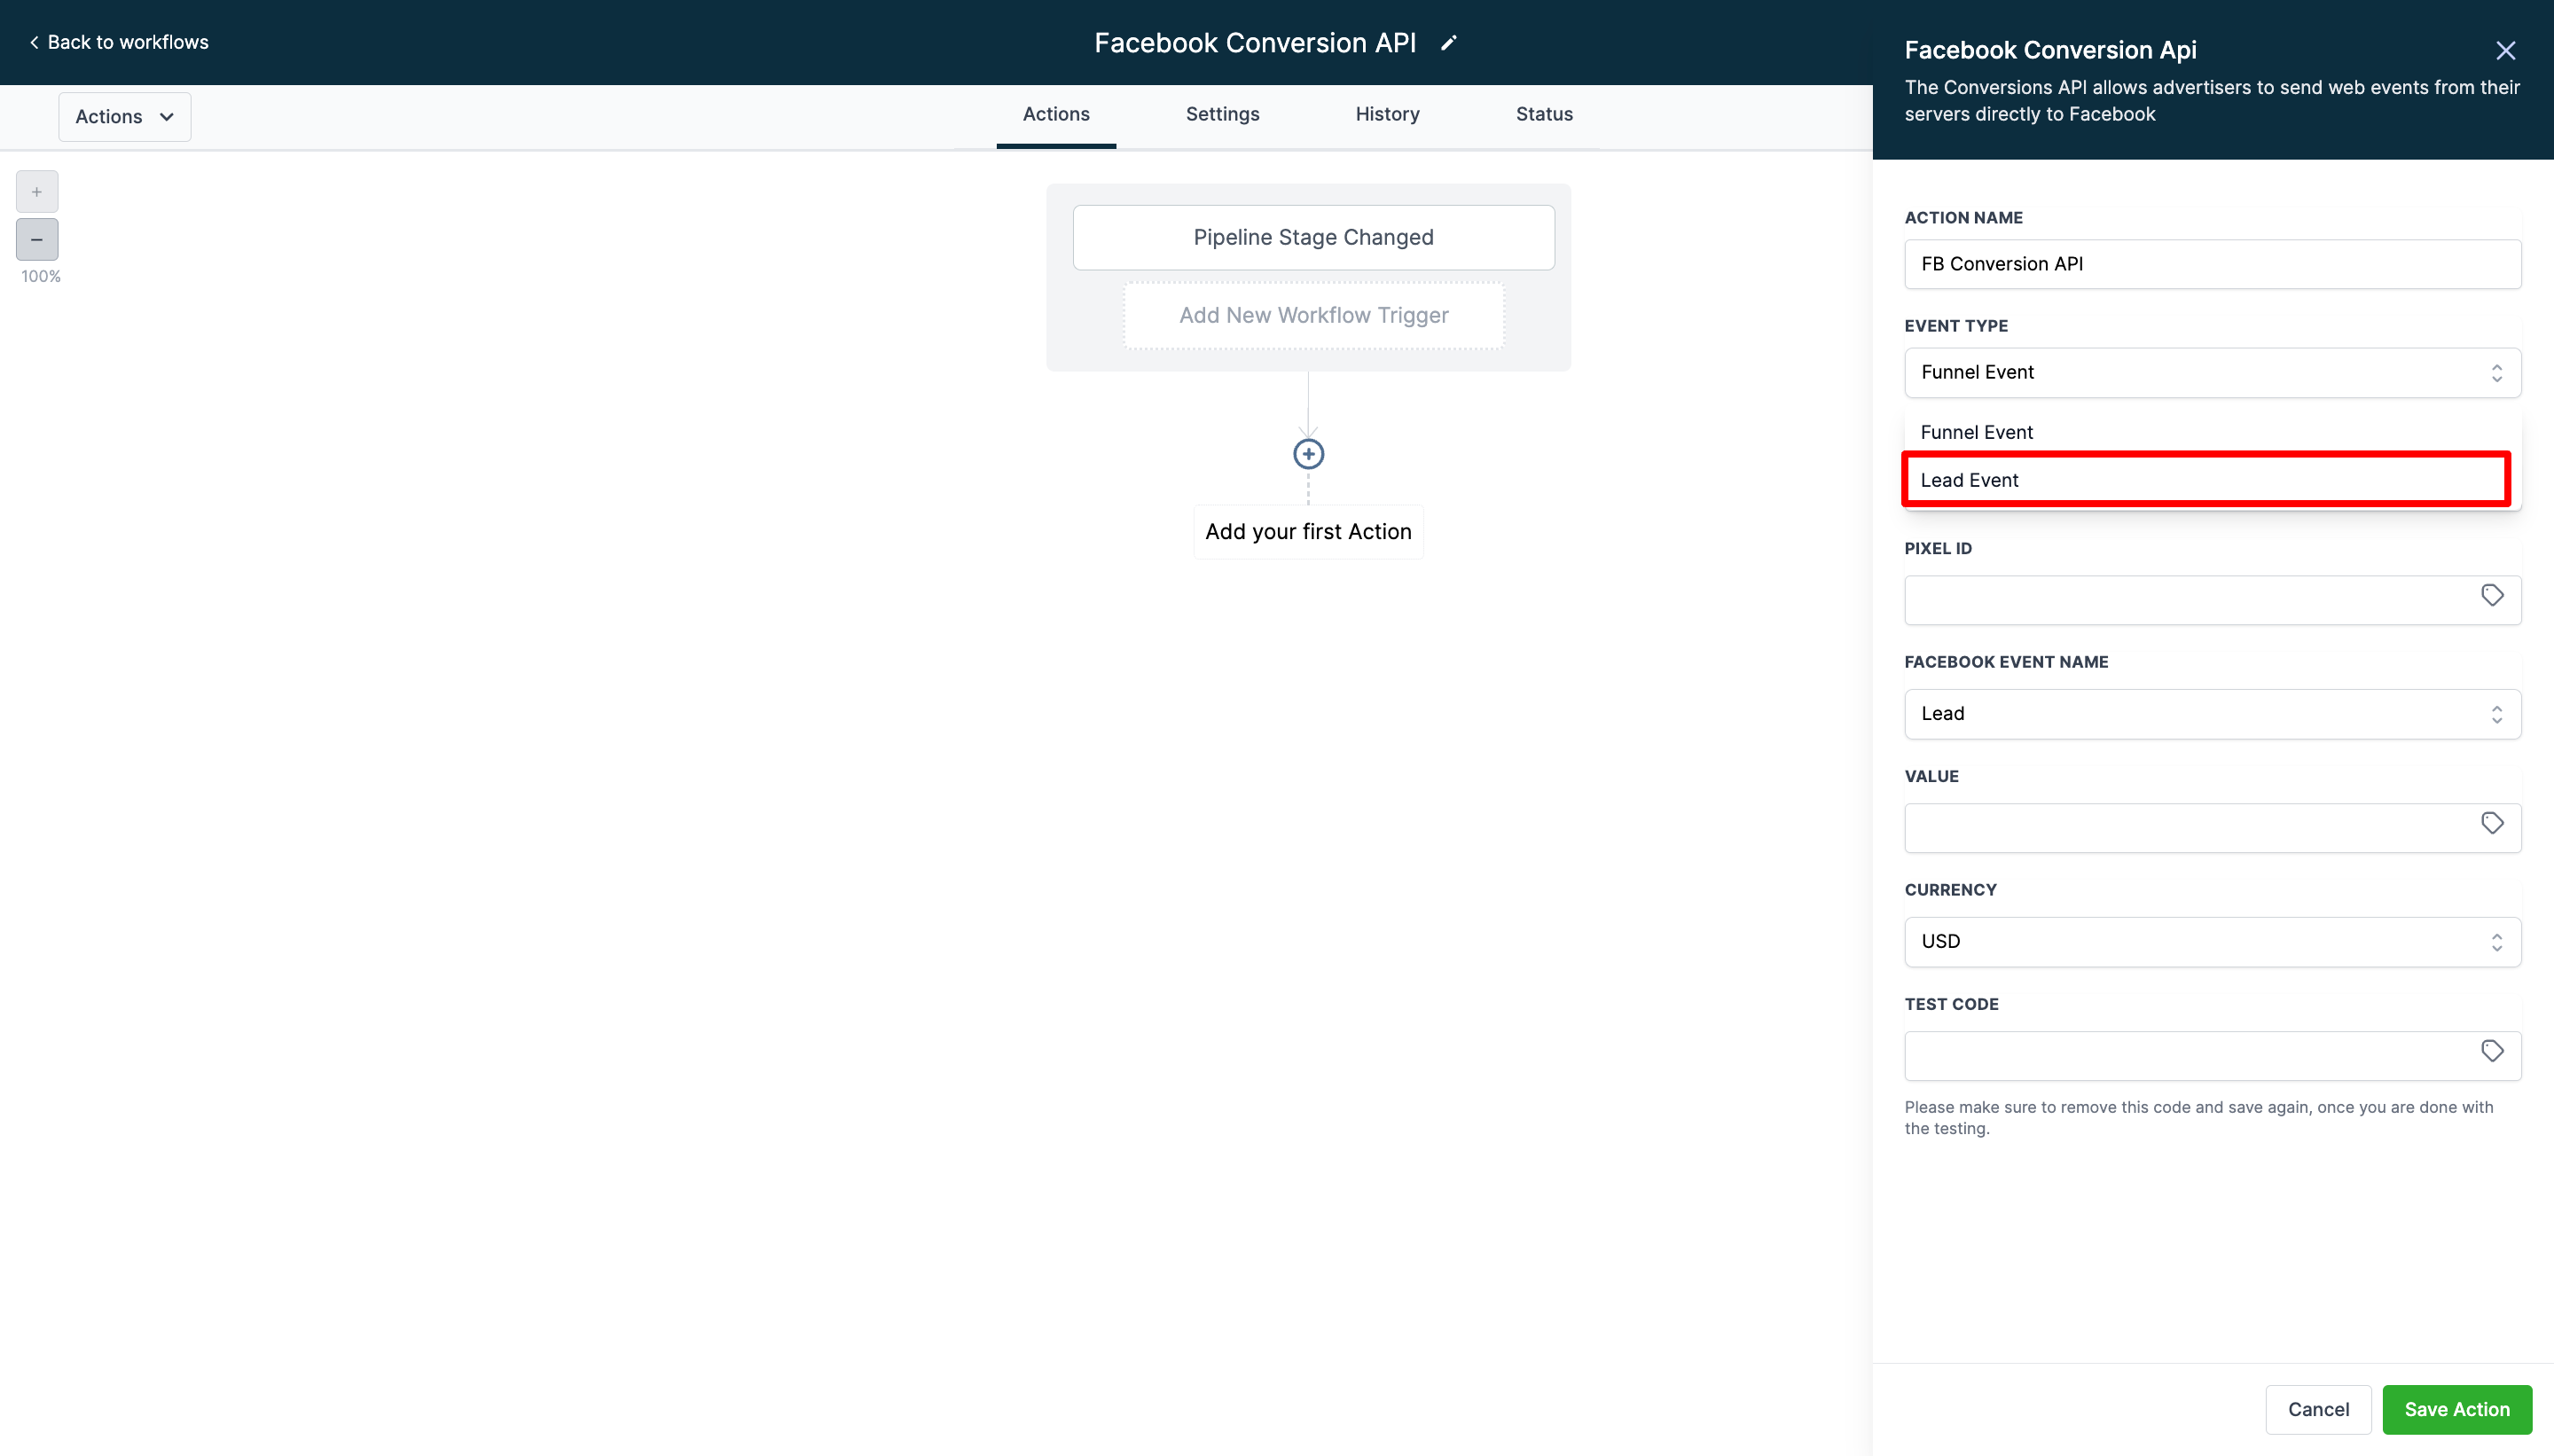
Add an action for Facebook Conversion API. In the event type, select “Lead event”:
To get the Access Token, go to your Facebook Events Manager> Data Sources> Settings> Scroll down and click on Generate Access Token.
To get the Pixel ID, go to settings and and find it there (it can also be called “Dataset ID”).
Fill in the “Stage name”. Save the Action, save and Publish the Workflow.
You can test your Workflow using the Lead Ads Test Tool. Choose the correct Page and Lead Ad Form, then Create a Lead. Once the Event is sent from the Lead Ads Test Tool, please go to Opportunity Pipeline and move the dummy Facebook lead to another stage configured in the Workflow. Once this is completed, check the workflow status as executed and the conversion API event in Event Manager.
Not a Funnelbud customer yet?
Try our all-in-one CRM for sales and marketing — free for 7 days, no commitment.