Settings in Documents & Contracts
Whether you prefer a professional tone or a more casual approach, you can customize the emails sent concerning your Documents and Contracts to perfectly align with your brand and communication style.
Hover on the Documents & Contracts dropdown and click on All Documents & Contracts, then head to the Settings page.
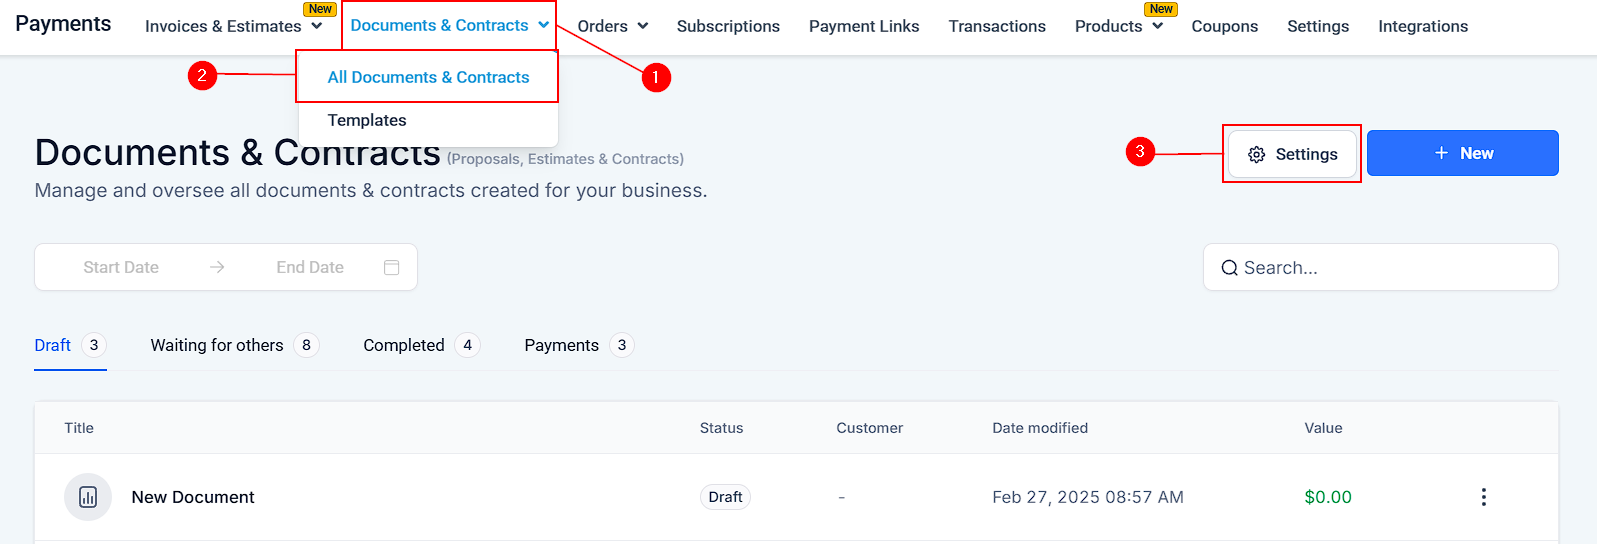
There are four options within the Settings to be configured:
- Customer Notifications
- Team Notifications
- Product Invoicing
- Document Settings
Customer Notifications
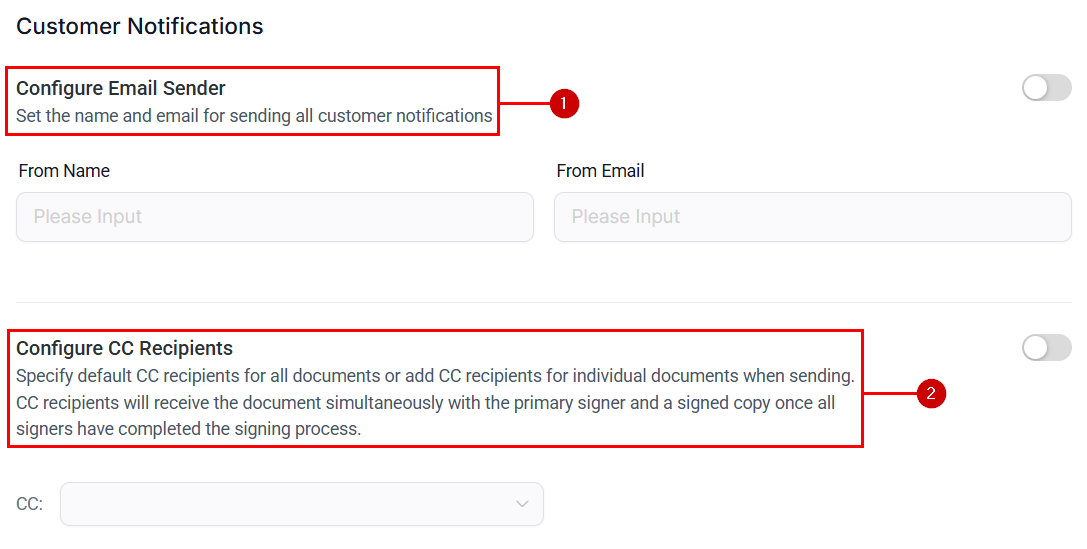
- Configure Email Sender: Enter the name and email from which all customer notifications should be sent.
- Configure CC Recipients: Include CC recipients when finalizing and sending documents. First, toggle on Configure CC Recipients, in the dropdown, then select the contact you want to CC. The global CC settings will be applied to:
-
- Templates.
- Individual documents.
- Public documents.
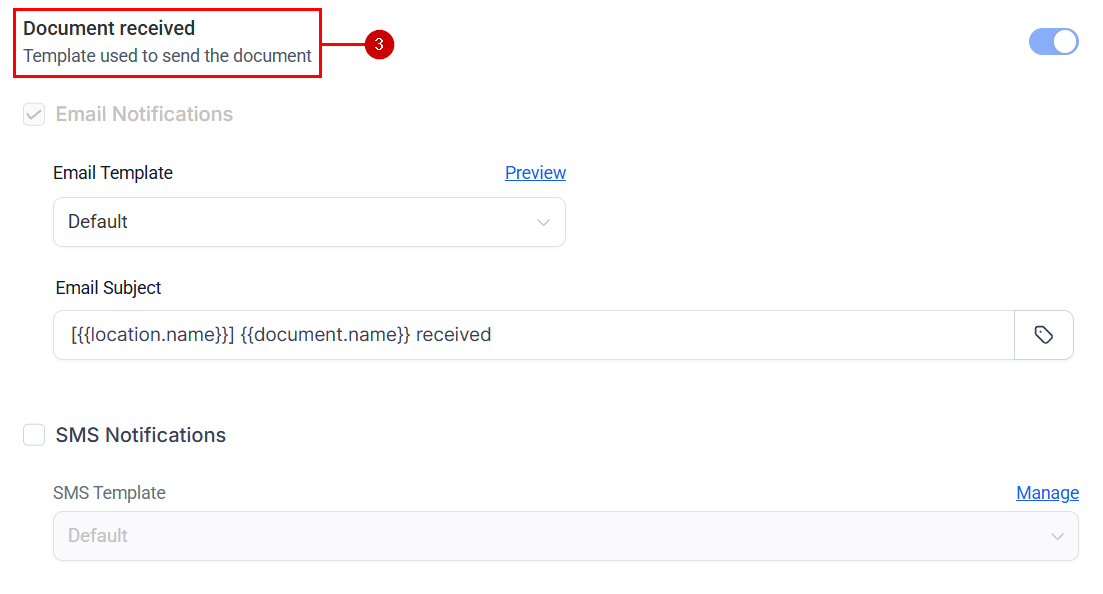
- Document Received: Toggle on the Document Received button to enable the template used in sending documents.
-
- Email Template: Choose the email template you want to be sent when a document is received from the drop-down menu.
- Email Subject: Summarize the main point of your email.
- SMS Notifications: Enable this option and select a template to notify customers via SMS.
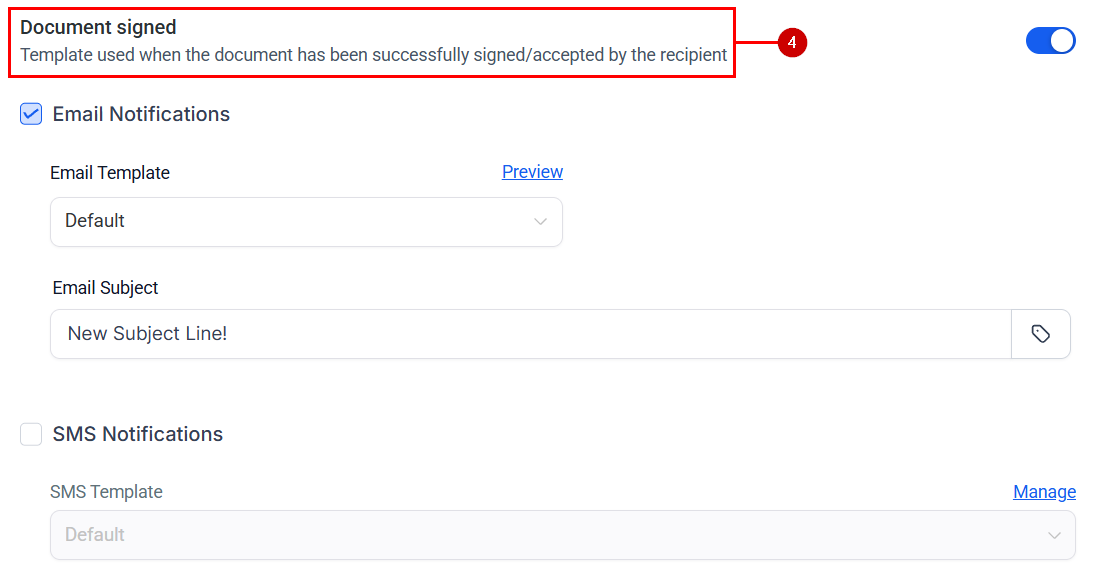
4. Document Signed: Toggle the Document Signed button to send a notification to the customer when the document has been successfully signed.
- Email Template: Choose the email template you want to be sent when a document is signed from the drop-down menu.
- Email Subject: Summarize the main point of your email.
- SMS Notifications: Enable this option and select a template to notify customers via SMS.
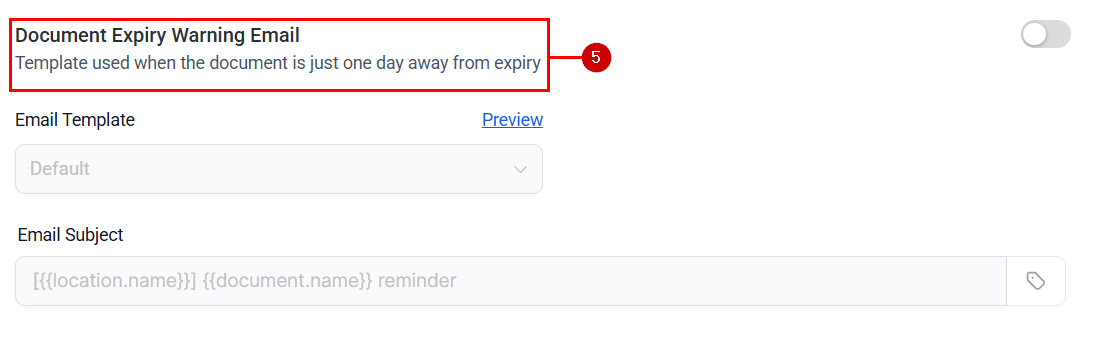
- Document Expiry Warning Email: Toggle the Document Expiry Warning switch to send a notification to the customer when the document is one day from expiration.
- Email Template: Choose the email template you want to be sent when a document is signed from the drop-down menu.
- Email Subject: Summarize the main point of your email.
Team Notifications
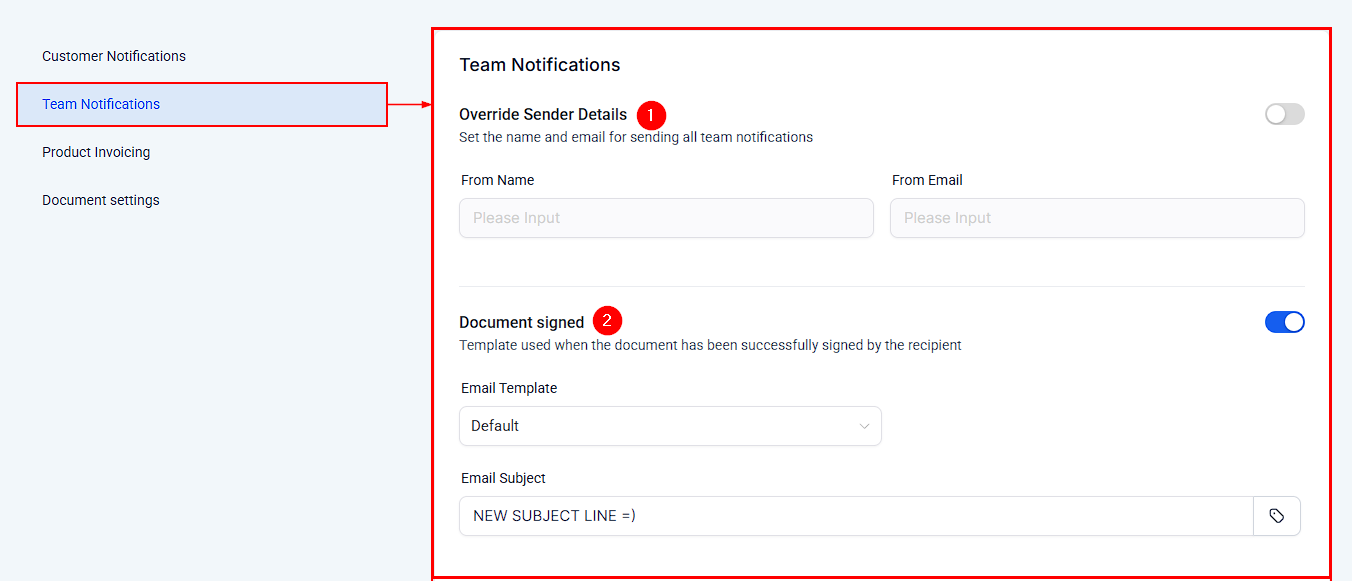
When enabled, team notifications will automatically be sent to the user who is sending the proposal or document by default. This ensures that everyone involved is kept in the know, facilitating better teamwork and communication.
- Override Sender Details: Enter the name and email from which all team notifications should be sent.
- Document Signed: Toggle the Document Signed button to send an internal notification when the document has been successfully signed/accepted by the recipient.
-
- Email Template: Choose the email template you want to be sent when a document is received from the drop-down menu.
- Email Subject: Summarize the main point of your email.
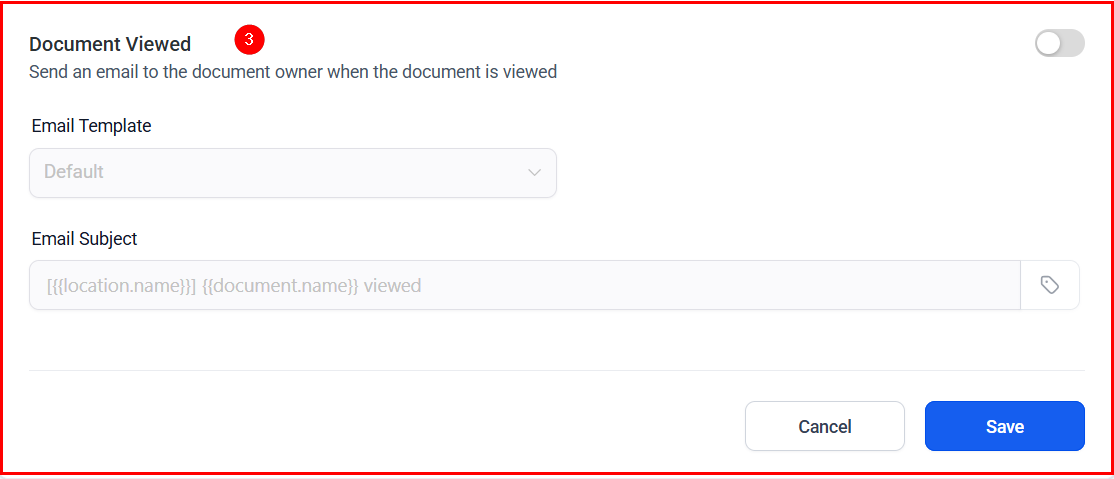
3. Document Viewed: Toggle the Document Viewed button to send an internal notification when the document has been seen by the recipient.
- Email Template: Choose the email template you want to be sent from the drop-down menu.
- Email Subject: Summarize the main point of your email.
Product Invoicing
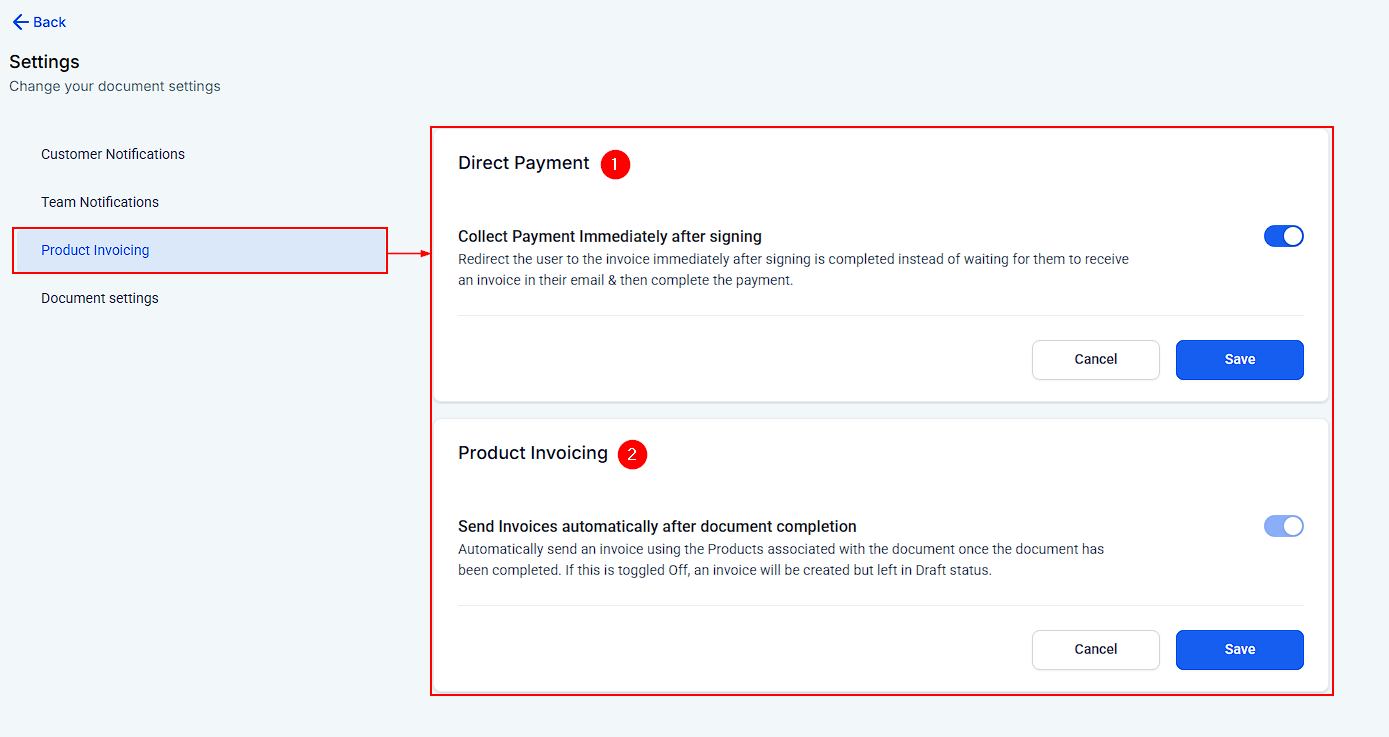
This feature enables users to create, send, and manage invoices efficiently.
- Direct Payment: Toggle this on to redirect the customer to the invoice immediately after the signing is completed. Enable the collection of Payment Immediately after signing.
- Product Invoicing: This is automatically toggled on when Direct payment is toggled off. It allows invoices to be generated and delivered to the client upon completion of the document. By default, the toggle is turned off, meaning the invoice will be created but not sent to the customer for payment.
Document Settings
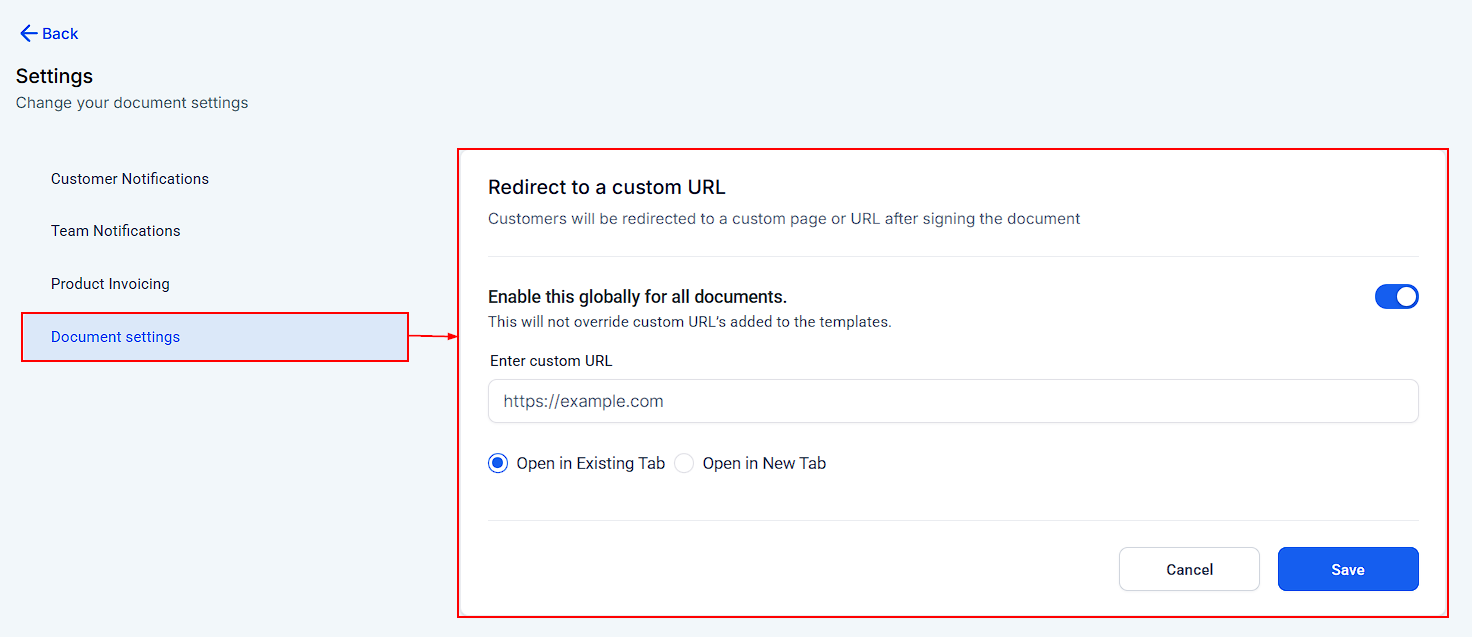
- Redirect to a Custom URL: This setting allows users to automatically send customers to a specific webpage after signing a document. Users can enable redirection globally for all documents or configure it per template. A custom URL can be entered, and users can choose whether the link opens in the existing tab or a new one. This ensures a seamless client experience, guiding them to a thank-you page, next steps, or any relevant destination.
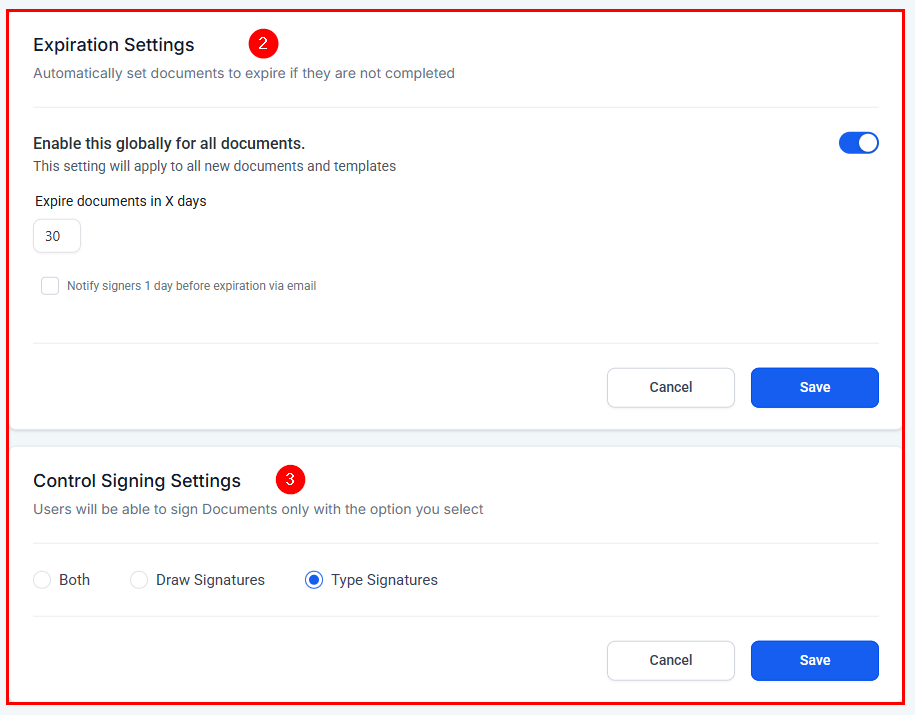
- Expiration Settings: To set expiration for all documents, enable Document Expiration globally and specify the number of days until expiration. The countdown begins at the time of sending and adheres to your local time zone for accurate tracking. Optionally, enable the setting to notify signers one day before the document expires, helping ensure timely completion.
- Control Signing Settings: Choose whether customers can draw, type, or use both methods to provide their signature, enabling hand-drawn signing alongside typed options.
Further Customization
Insert custom values such as links, customer details, total amounts, and other information directly into your email content, thereby enhancing your communications’ engagement and informational value.
Navigate to the Template section and create a new template.
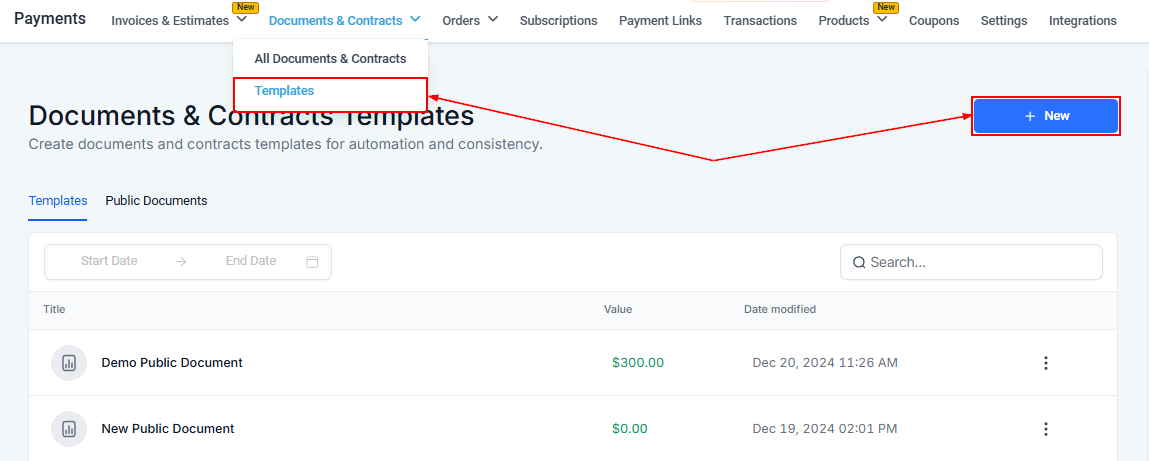
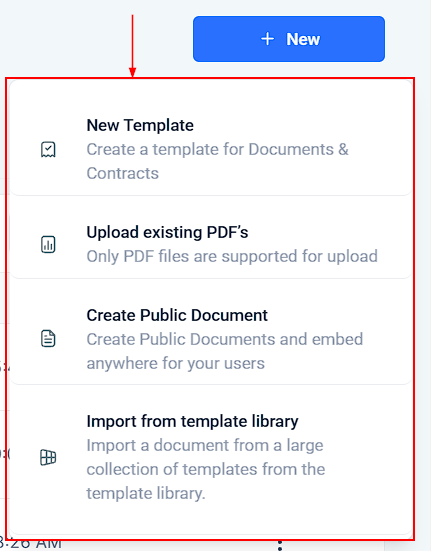
Click on New Template to create a template from scratch, upload an existing PDF of your choice, create a Public Document, or Import from Template Library.
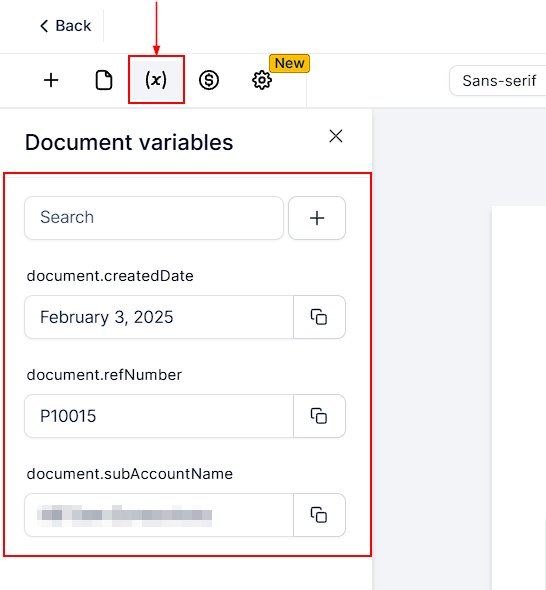
Document Variables
This feature allows you to insert dynamic placeholders into the document.
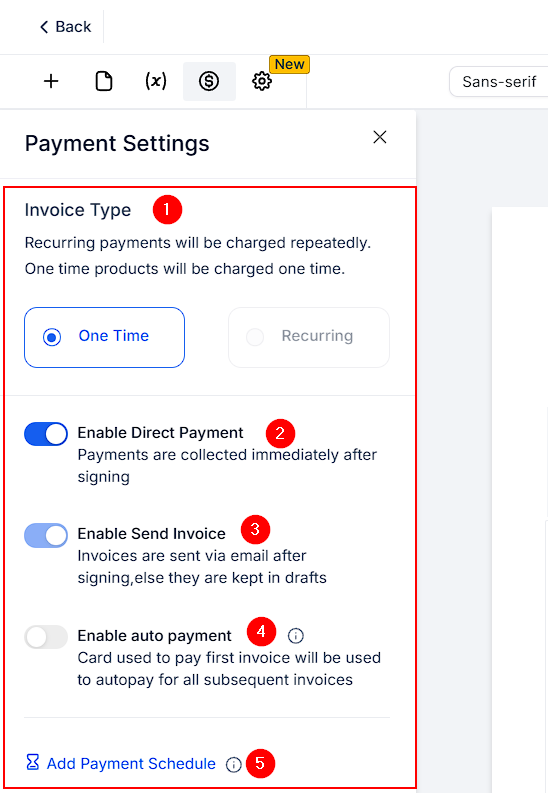
Payment Settings
- Invoice Type: The Invoice Type determines whether the payment is a one-time charge or a recurring payment.
- Enable Direct Payment: Toggle on to collect payments from clients immediately after the customer signs the contract.
- Enable Send Invoice: Toggle off Enable Direct Payment to turn on “Enable Send Invoice”. This allows invoices to be sent to the customer’s email after signing the contract.
- Enable Auto Payment: When this option is enabled, the card used to pay the first invoice will be automatically charged for all future invoices in the payment schedule. This is useful for subscription-based or installment payments.
- Add Payment Schedule: Clicking on Add Payment Schedule allows users to set up a structured payment plan. This could involve breaking down the total amount into multiple payments over some time.
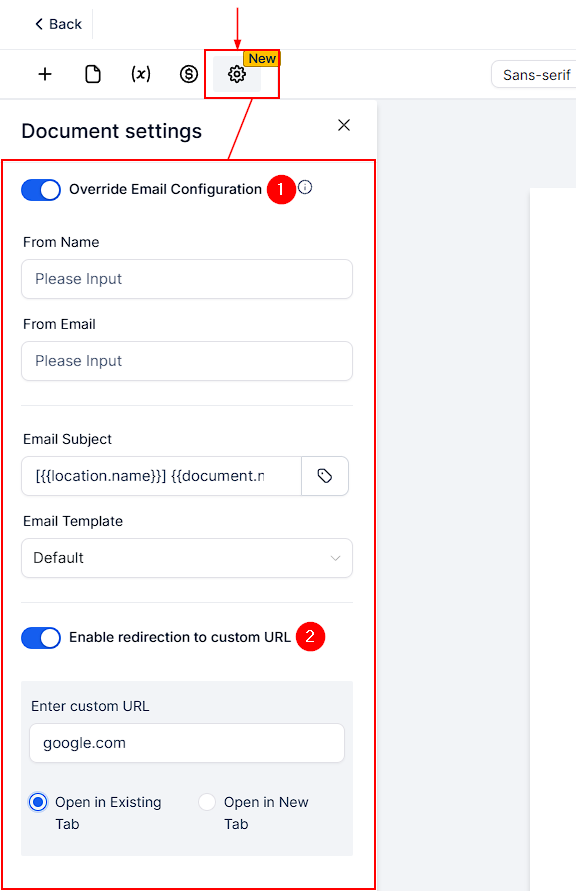
Document Settings (Templates)
The Document Settings panel allows users to customize how emails are sent and whether document signers are redirected to a specific URL after interacting with the document.
- Override Email Configuration: When this toggle is enabled, it allows users to customize the email settings for sending documents. The available fields include:
-
- From Name: The sender’s name that will appear in the email.
- From Email: The sender’s email address.
- Email Subject: A dynamic field where placeholders like
{{location.name}}and{{document.name}}can be used to auto-fill details in the subject line. - Email Template: A dropdown menu to select a predefined email template.
- Enable Redirection to Custom URL: When a customer signs a document or completes a payment within your document, they can be redirected to a custom URL of your choice. You can set this redirection globally for all Documents & Contracts or configure it for individual templates. Choose how your link opens—whether in an existing tab or a new tab—to ensure a smoother client experience.
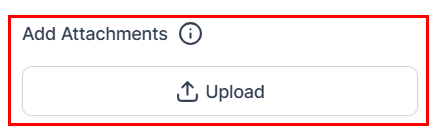
- Add Attachments: Upload files to include them as attachments in your outgoing emails. Whether the email is sent manually or through a workflow, the selected files will be delivered as standard email attachments—fully visible and downloadable directly from the recipient’s inbox.
Custom Values
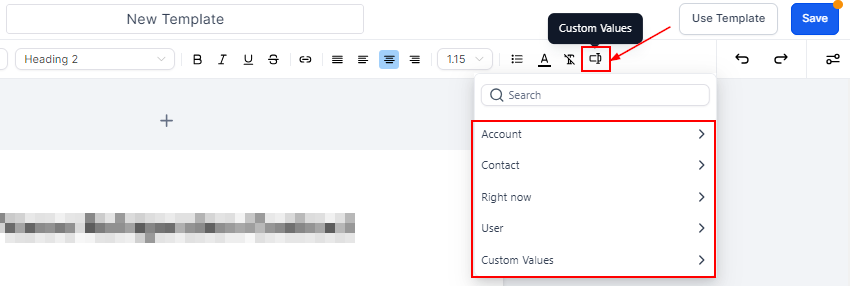
On the top right side of the template builder, you will find the Custom Values Icon. Use this to add already created custom values to the template.
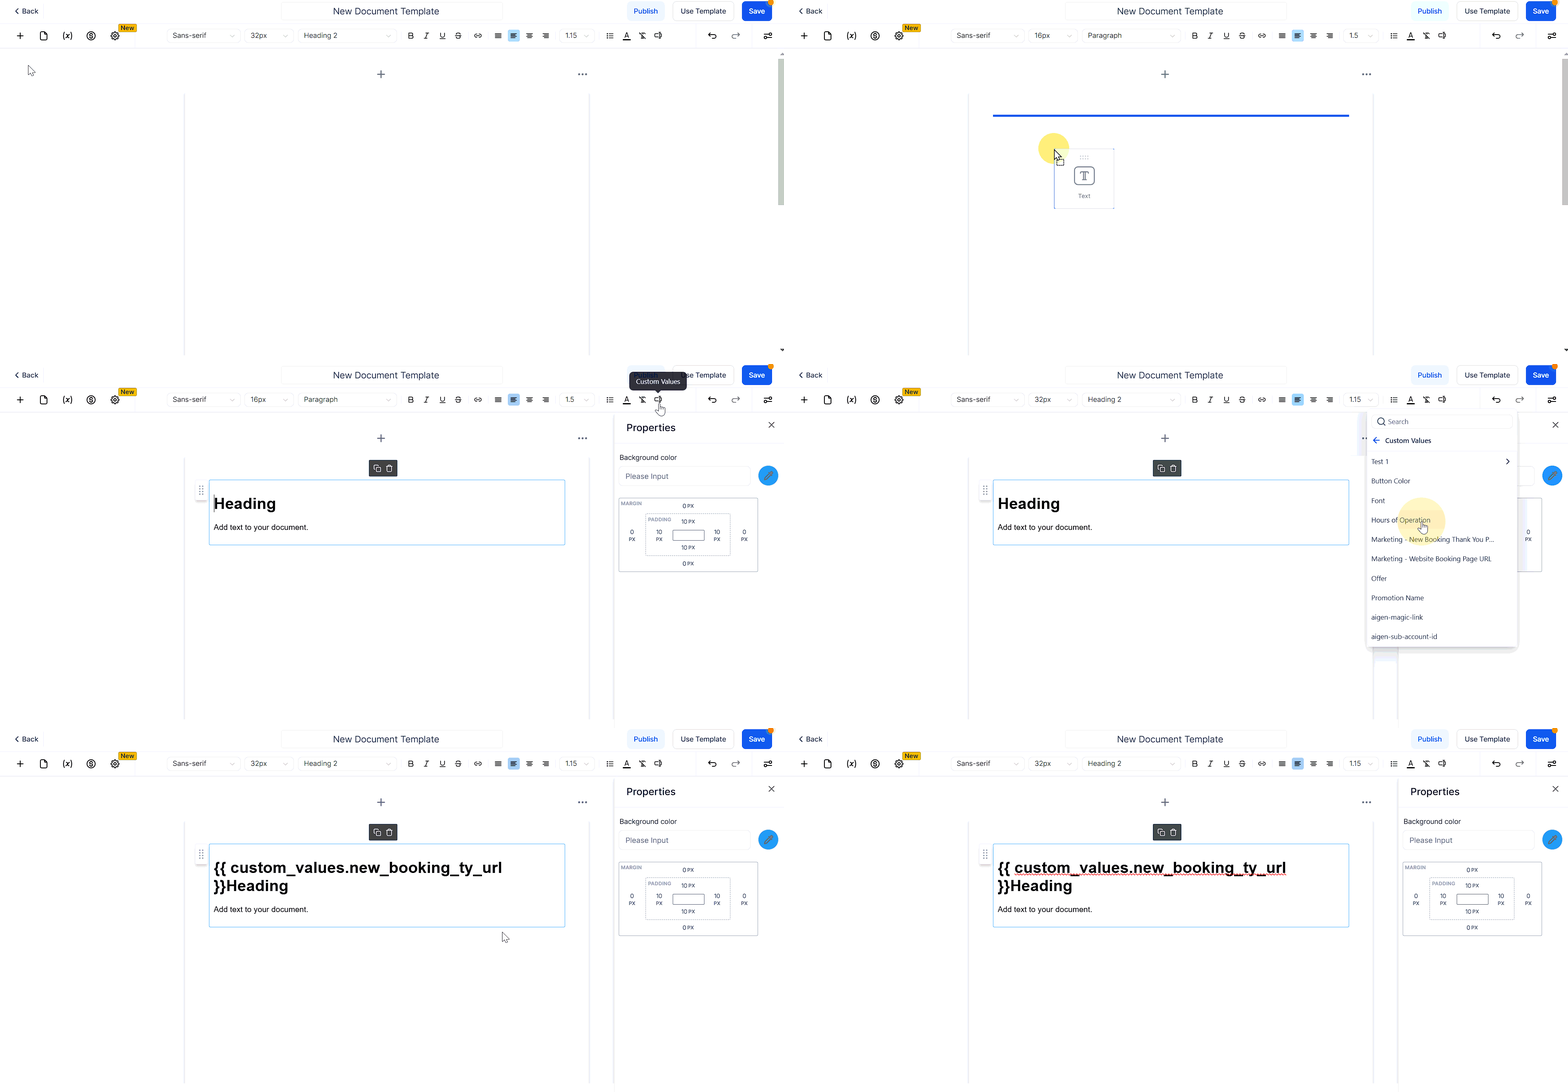
📌NOTE: A text element must be added to the template before the Custom Values icon will be accessible.
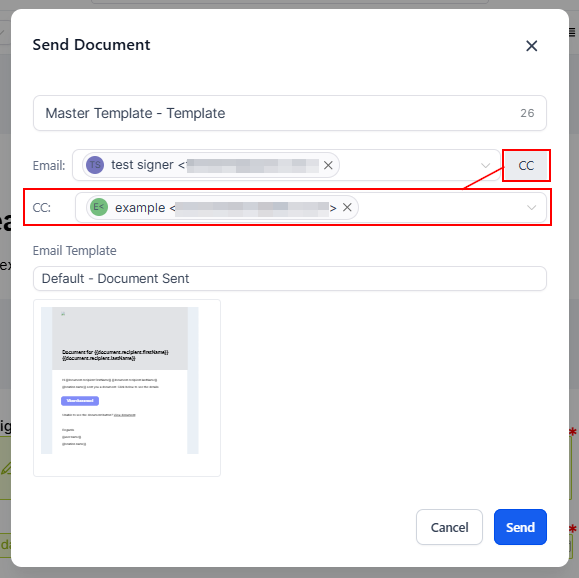
Sending Via Email- Adding a CC
You can add a CC when sending a document through email.
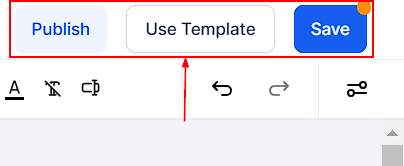
Finally, remember to click on the Save button after making any changes to the template and Publish to create a public document.
This feature in your CRM makes managing your documents and contracts easy and efficient. With customized notifications and invoicing, you can ensure clear communication between your team and clients.
Not a Funnelbud customer yet?
Try our all-in-one CRM for sales and marketing — free for 7 days, no commitment.